Canon PowerShot SD700 IS ImageBrowser 5.6 Software User Guide - Page 73
Rotating Images
 |
View all Canon PowerShot SD700 IS manuals
Add to My Manuals
Save this manual to your list of manuals |
Page 73 highlights
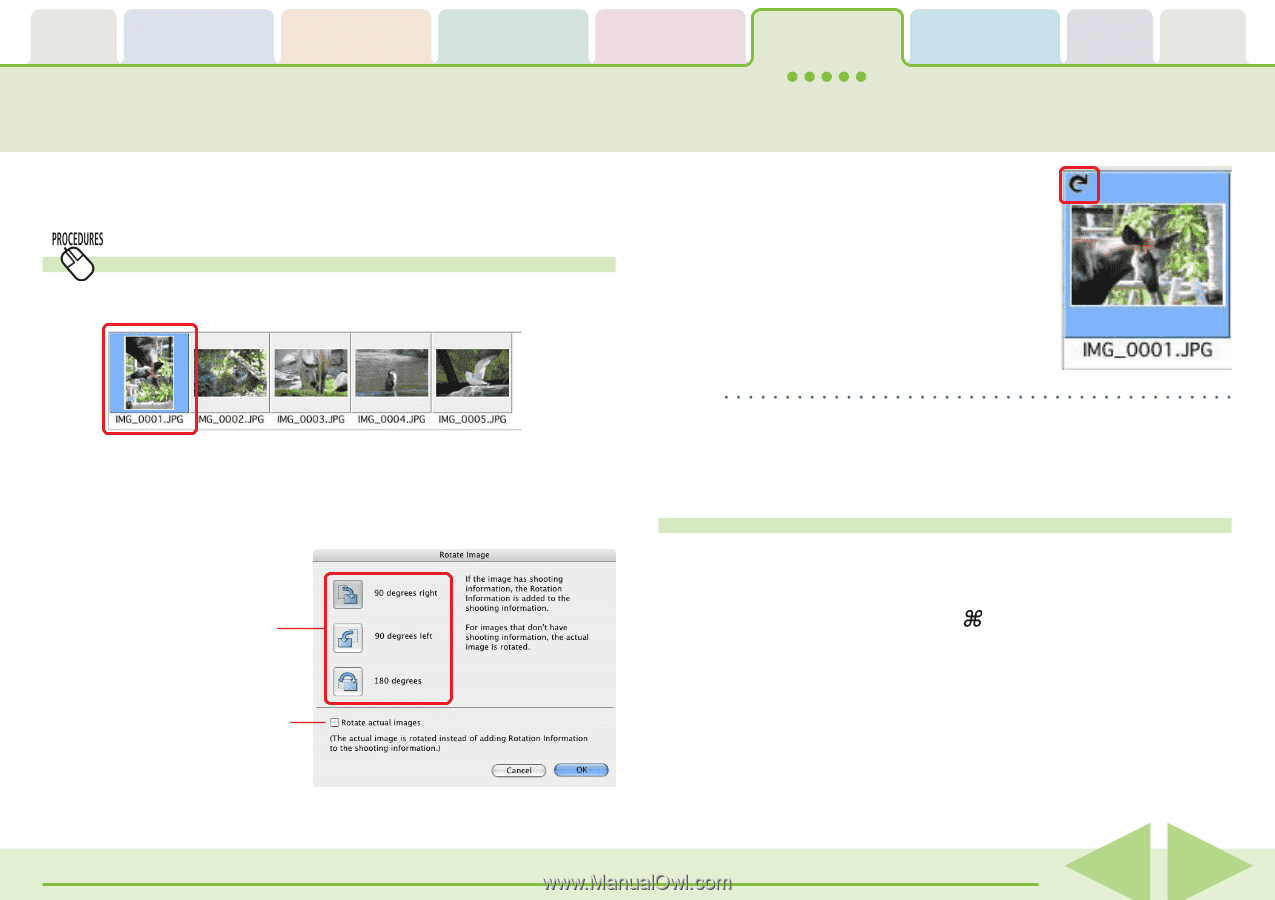
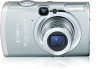
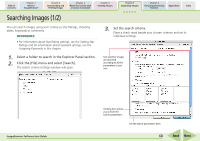
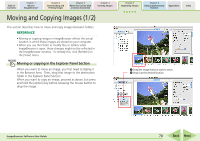
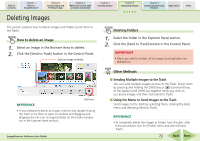
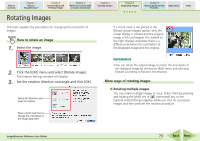
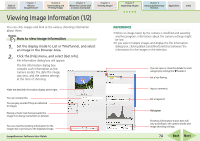
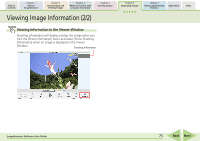
Table of Contents Chapter 1 What is ImageBrowser? Chapter 2 Downloading and Printing Images Chapter 3 What You Can Do with a Camera Connected Chapter 4 Viewing Images Chapter 5 Organizing Images Chapter 6 Using Supplementary Features Appendices Index Rotating Images This topic explains the procedures for changing the orientation of images. How to rotate an image 1. Select the image. If a check mark is not placed in the [Rotate actual images] option, only the image display is rotated and the original image is left unchanged. The symbol to the right displays whenever there is a difference between the orientation of the displayed image and the original. 2. Click the [Edit] menu and select [Rotate Image]. The rotation settings window will display. 3. Set the rotation direction and angle and click [OK]. Selects the direction and angle of rotation. Place a check mark here to change the orientation of the image data itself. REFERENCE • You can rotate the original image to match the orientation of the displayed image by clicking the [Edit] menu and selecting [Rotate According to Rotation Information]. More ways of rotating images ■ Rotating multiple images You can rotate multiple images at once. Select them by pressing and holding the [shift] key or [ ] (command) key, or the [option] and [shift] key together while you click on successive images and then perform the rotation procedure. ImageBrowser Software User Guide 73 Back Next
-
 1
1 -
2
-
3
-
4
-
5
-
6
-
7
-
8
-
9
-
10
-
11
-
12
-
13
-
14
-
15
-
16
-
17
-
18
-
19
-
20
-
21
-
22
-
23
-
24
-
25
-
26
-
27
-
28
-
29
-
30
-
31
-
32
-
33
-
34
-
35
-
36
-
37
-
38
-
39
-
40
-
41
-
42
-
43
-
44
-
45
-
46
-
47
-
48
-
49
-
50
-
51
-
52
-
53
-
54
-
55
-
56
-
57
-
58
-
59
-
60
-
61
-
62
-
63
-
64
-
65
-
66
-
67
-
 68
68 -
 69
69 -
 70
70 -
 71
71 -
 72
72 -
 73
73 -
 74
74 -
 75
75 -
 76
76 -
 77
77 -
 78
78 -
79
-
80
-
81
-
82
-
83
-
84
-
85
-
86
-
87
-
88
-
89
-
90
-
91
-
92
-
93
-
94
-
95
-
96
-
97
-
98
-
99
-
100
-
101
-
102
-
103
-
104
-
105
-
106
-
107
-
108
-
109
-
110
-
111
-
112
-
113
-
114
-
115
-
116
-
117
-
118
-
119
-
120
-
121
-
122
-
123
-
124
-
125
-
126
-
127
-
128
-
129
-
130
-
131
-
132
 |
 |