Epson Expression 1680 Special Edition User Manual (w/EPSON TWAIN software) - Page 105
EPSON, Expression 1680 Reference Guide, screws to secure the connector.
 |
View all Epson Expression 1680 Special Edition manuals
Add to My Manuals
Save this manual to your list of manuals |
Page 105 highlights
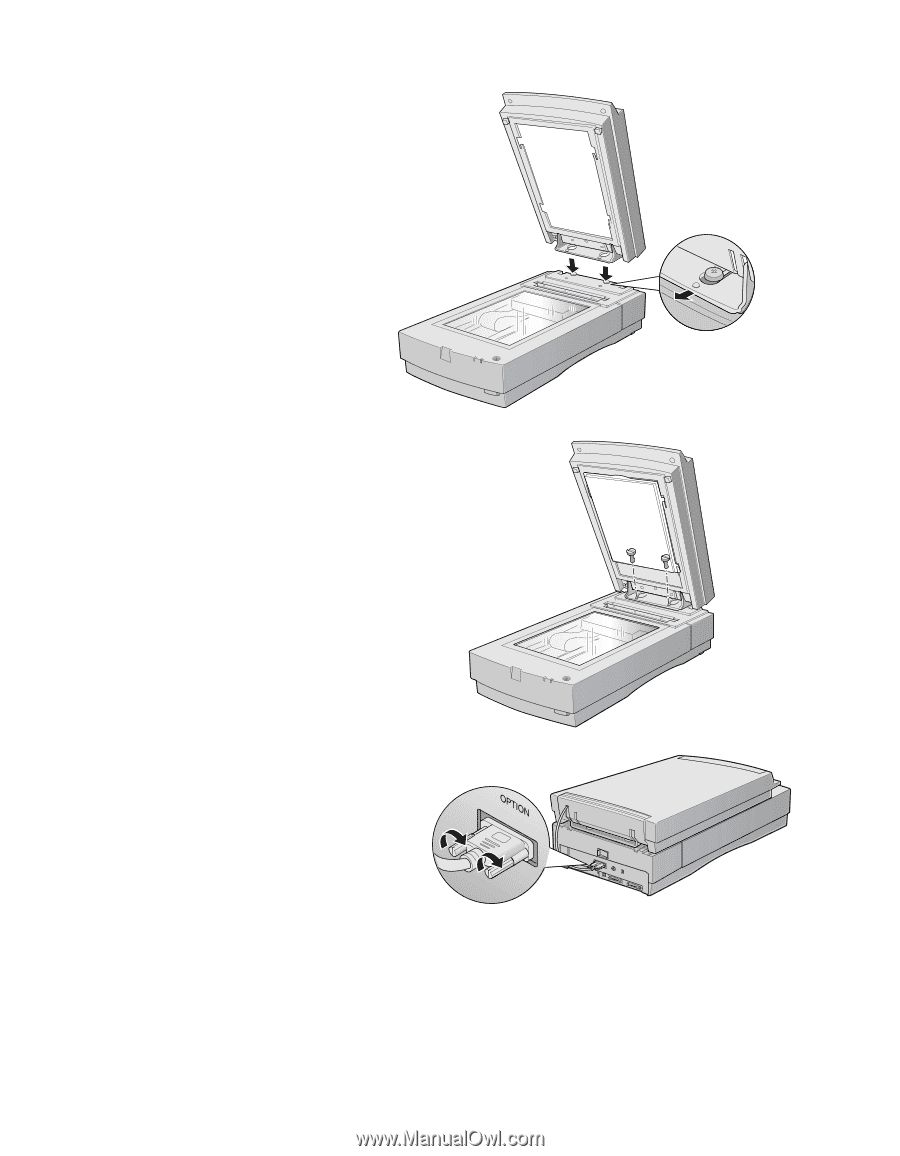
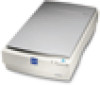
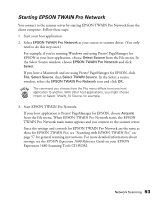
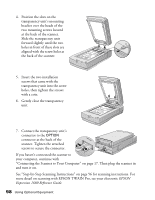
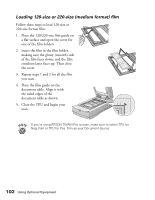
4. Position the slots on the transparency unit's mounting bracket over the heads of the two mounting screws located at the back of the scanner. Slide the transparency unit forward slightly until the two holes in front of these slots are aligned with the screw holes at the back of the scanner. 5. Insert the two installation screws that came with the transparency unit into the screw holes, then tighten the screws with a coin. 6. Gently close the transparency unit. 7. Connect the transparency unit's connector to the OPTION connector at the back of the scanner. Tighten the attached screws to secure the connector. If you haven't connected the scanner to your computer, continue with "Connecting the Scanner to Your Computer" on page 17. Then plug the scanner in and turn it on. See "Step-by-Step Scanning Instructions" on page 56 for scanning instructions. For more detail on scanning with EPSON TWAIN Pro, see your electronic EPSON Expression 1680 Reference Guide. 98 Using Optional Equipment
-
 1
1 -
2
-
3
-
4
-
5
-
6
-
7
-
8
-
9
-
10
-
11
-
12
-
13
-
14
-
15
-
16
-
17
-
18
-
19
-
20
-
21
-
22
-
23
-
24
-
25
-
26
-
27
-
28
-
29
-
30
-
31
-
32
-
33
-
34
-
35
-
36
-
37
-
38
-
39
-
40
-
41
-
42
-
43
-
44
-
45
-
46
-
47
-
48
-
49
-
50
-
51
-
52
-
53
-
54
-
55
-
56
-
57
-
58
-
59
-
60
-
61
-
62
-
63
-
64
-
65
-
66
-
67
-
68
-
69
-
70
-
71
-
72
-
73
-
74
-
75
-
76
-
77
-
78
-
79
-
80
-
81
-
82
-
83
-
84
-
85
-
86
-
87
-
88
-
89
-
90
-
91
-
92
-
93
-
94
-
95
-
96
-
97
-
98
-
99
-
 100
100 -
 101
101 -
 102
102 -
 103
103 -
 104
104 -
 105
105 -
 106
106 -
 107
107 -
 108
108 -
 109
109 -
 110
110 -
111
-
112
-
113
-
114
-
115
-
116
-
117
-
118
-
119
-
120
-
121
-
122
-
123
-
124
-
125
-
126
-
127
-
128
-
129
-
130
-
131
-
132
-
133
-
134
-
135
-
136
-
137
-
138
-
139
-
140
-
141
-
142
-
143
-
144
-
145
-
146
-
147
-
148
-
149
-
150
-
151
-
152
-
153
-
154
-
155
-
156
-
157
-
158
-
159
 |
 |