Epson Expression 1680 Special Edition User Manual (w/EPSON TWAIN software) - Page 63
Step-by-Step Scanning Instructions, Placing Your Original Document
 |
View all Epson Expression 1680 Special Edition manuals
Add to My Manuals
Save this manual to your list of manuals |
Page 63 highlights
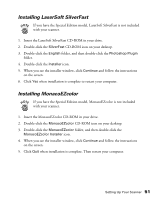
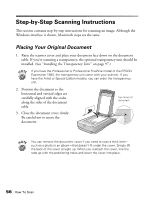
Step-by-Step Scanning Instructions This section contains step-by-step instructions for scanning an image. Although the Windows interface is shown, Macintosh steps are the same. Placing Your Original Document 1. Raise the scanner cover and place your document face down on the document table. If you're scanning a transparency, the optional transparency unit should be installed. (See "Installing the Transparency Unit" on page 97.) If you have the Professional or Professional FireWire model of the EPSON Expression 1680, the transparency unit came with your scanner. If you have the Artist or Special Edition models, you can order the transparency unit. 2. Position the document so the horizontal and vertical edges are carefully aligned with the scales along the sides of the document table. 3. Close the document cover slowly. Be careful not to move the document. top corner of document You can remove the document cover if you need to scan a thick item- such as a photo in an album-that doesn't fit under the cover. Simply lift the back of the cover straight up. When you reattach the cover, line the rods up with the positioning holes and lower the cover into place. 56 How To Scan
-
 1
1 -
2
-
3
-
4
-
5
-
6
-
7
-
8
-
9
-
10
-
11
-
12
-
13
-
14
-
15
-
16
-
17
-
18
-
19
-
20
-
21
-
22
-
23
-
24
-
25
-
26
-
27
-
28
-
29
-
30
-
31
-
32
-
33
-
34
-
35
-
36
-
37
-
38
-
39
-
40
-
41
-
42
-
43
-
44
-
45
-
46
-
47
-
48
-
49
-
50
-
51
-
52
-
53
-
54
-
55
-
56
-
57
-
 58
58 -
 59
59 -
 60
60 -
 61
61 -
 62
62 -
 63
63 -
 64
64 -
 65
65 -
 66
66 -
 67
67 -
 68
68 -
69
-
70
-
71
-
72
-
73
-
74
-
75
-
76
-
77
-
78
-
79
-
80
-
81
-
82
-
83
-
84
-
85
-
86
-
87
-
88
-
89
-
90
-
91
-
92
-
93
-
94
-
95
-
96
-
97
-
98
-
99
-
100
-
101
-
102
-
103
-
104
-
105
-
106
-
107
-
108
-
109
-
110
-
111
-
112
-
113
-
114
-
115
-
116
-
117
-
118
-
119
-
120
-
121
-
122
-
123
-
124
-
125
-
126
-
127
-
128
-
129
-
130
-
131
-
132
-
133
-
134
-
135
-
136
-
137
-
138
-
139
-
140
-
141
-
142
-
143
-
144
-
145
-
146
-
147
-
148
-
149
-
150
-
151
-
152
-
153
-
154
-
155
-
156
-
157
-
158
-
159
 |
 |