Epson Expression 1680 Special Edition User Manual (w/EPSON TWAIN software) - Page 148
Assigning an IP Address on Windows NT 4.0, of 169.254.XXX.XXX.
 |
View all Epson Expression 1680 Special Edition manuals
Add to My Manuals
Save this manual to your list of manuals |
Page 148 highlights
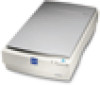
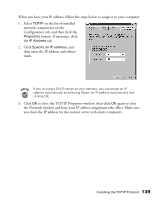
Assigning an IP Address on Windows NT 4.0 If your network is connected to the Internet, ask your Internet provider or IS department for a formal IP address. If your network is not connected to the Internet, you can use an IP address in the following ranges: 10.0.0.0 to 10.255.255.255, 172.16.0.0 to 172.31.255.255, or 192.168.0.0 to 192.168.255.255. Make sure you use a different IP address for every computer on your network. If you are running a mixed Windows 95, Windows 98, Windows Me, and Windows NT environment, you can use an IP address in the range of 169.254.XXX.XXX. If you use IP addresses in the ranges listed above, you may need to change them before you connect the network to the Internet. Check with your network administrator. If your network uses a DHCP server, you don't need to obtain an IP address before beginning this procedure-the server finds one for you. Follow the steps below to assign the IP address to your computer: 1. Select TCP/IP Protocol in the Network Protocols list on the Protocols tab, and then click the Properties button. 2. Click the IP Address tab to display the screen to the right. 3. Click Specify an IP address, and then enter your IP address and subnet mask. Click OK. (If you're using a DHCP server on your network, you can assign an IP address automatically by selecting Obtain an IP address from a DHCP server and clicking OK.) 4. Click OK again to close the Network window and have your IP address assignment take effect. Make sure you share the IP address for the scanner server with all client computers on the network. Installing the TCP/IP Protocol 141
-
 1
1 -
2
-
3
-
4
-
5
-
6
-
7
-
8
-
9
-
10
-
11
-
12
-
13
-
14
-
15
-
16
-
17
-
18
-
19
-
20
-
21
-
22
-
23
-
24
-
25
-
26
-
27
-
28
-
29
-
30
-
31
-
32
-
33
-
34
-
35
-
36
-
37
-
38
-
39
-
40
-
41
-
42
-
43
-
44
-
45
-
46
-
47
-
48
-
49
-
50
-
51
-
52
-
53
-
54
-
55
-
56
-
57
-
58
-
59
-
60
-
61
-
62
-
63
-
64
-
65
-
66
-
67
-
68
-
69
-
70
-
71
-
72
-
73
-
74
-
75
-
76
-
77
-
78
-
79
-
80
-
81
-
82
-
83
-
84
-
85
-
86
-
87
-
88
-
89
-
90
-
91
-
92
-
93
-
94
-
95
-
96
-
97
-
98
-
99
-
100
-
101
-
102
-
103
-
104
-
105
-
106
-
107
-
108
-
109
-
110
-
111
-
112
-
113
-
114
-
115
-
116
-
117
-
118
-
119
-
120
-
121
-
122
-
123
-
124
-
125
-
126
-
127
-
128
-
129
-
130
-
131
-
132
-
133
-
134
-
135
-
136
-
137
-
138
-
139
-
140
-
141
-
142
-
 143
143 -
 144
144 -
 145
145 -
 146
146 -
 147
147 -
 148
148 -
 149
149 -
 150
150 -
 151
151 -
 152
152 -
 153
153 -
154
-
155
-
156
-
157
-
158
-
159
 |
 |