Epson Expression 1680 Special Edition User Manual (w/EPSON TWAIN software) - Page 132
cross-hatch patterns, appear in the image when
 |
View all Epson Expression 1680 Special Edition manuals
Add to My Manuals
Save this manual to your list of manuals |
Page 132 highlights
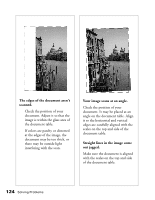
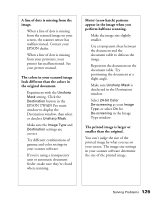
A line of dots is missing from the image. s When a line of dots is missing from the scanned image on your screen, the scanner sensor has malfunctioned. Contact your EPSON dealer. s When a line of dots is missing from your printouts, your printer has malfunctioned. See your printer manual. The colors in your scanned image look different than the colors in the original document. s Experiment with the Unsharp Mask setting. Click the Destination button in the EPSON TWAIN Pro main window to display the Destination window, then select or deselect Unsharp Mask. s Make sure the Image Type and Destination settings are correct. s Try different combinations of gamma and color settings in your scanner software. s If you're using a transparency unit or automatic document feeder, make sure they're closed when scanning. Moiré (cross-hatch) patterns appear in the image when you perform halftone scanning. s Make the image size slightly smaller. s Use a transparent sheet between the document and the document table to defocus the image. s Reposition the document on the document table. Try positioning the document at a slight angle. s Make sure Unsharp Mask is deselected in the Destination window. s Select 24-bit Color De-screening as your Image Type, or select On for De-screening in the Image Type window. The printed image is larger or smaller than the original. You can't judge the size of the printed image by what you see on your screen. The image size settings in your scanner software determine the size of the printed image. Solving Problems 125
-
 1
1 -
2
-
3
-
4
-
5
-
6
-
7
-
8
-
9
-
10
-
11
-
12
-
13
-
14
-
15
-
16
-
17
-
18
-
19
-
20
-
21
-
22
-
23
-
24
-
25
-
26
-
27
-
28
-
29
-
30
-
31
-
32
-
33
-
34
-
35
-
36
-
37
-
38
-
39
-
40
-
41
-
42
-
43
-
44
-
45
-
46
-
47
-
48
-
49
-
50
-
51
-
52
-
53
-
54
-
55
-
56
-
57
-
58
-
59
-
60
-
61
-
62
-
63
-
64
-
65
-
66
-
67
-
68
-
69
-
70
-
71
-
72
-
73
-
74
-
75
-
76
-
77
-
78
-
79
-
80
-
81
-
82
-
83
-
84
-
85
-
86
-
87
-
88
-
89
-
90
-
91
-
92
-
93
-
94
-
95
-
96
-
97
-
98
-
99
-
100
-
101
-
102
-
103
-
104
-
105
-
106
-
107
-
108
-
109
-
110
-
111
-
112
-
113
-
114
-
115
-
116
-
117
-
118
-
119
-
120
-
121
-
122
-
123
-
124
-
125
-
126
-
 127
127 -
 128
128 -
 129
129 -
 130
130 -
 131
131 -
 132
132 -
 133
133 -
 134
134 -
 135
135 -
 136
136 -
 137
137 -
138
-
139
-
140
-
141
-
142
-
143
-
144
-
145
-
146
-
147
-
148
-
149
-
150
-
151
-
152
-
153
-
154
-
155
-
156
-
157
-
158
-
159
 |
 |