Epson Expression 1680 Special Edition User Manual (w/EPSON TWAIN software) - Page 112
Installing the Automatic Document Feeder, clean and dust free.
 |
View all Epson Expression 1680 Special Edition manuals
Add to My Manuals
Save this manual to your list of manuals |
Page 112 highlights
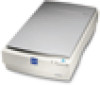
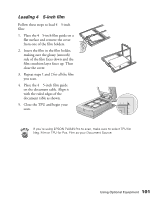
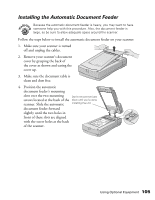
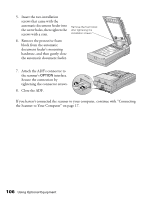
Installing the Automatic Document Feeder Because the automatic document feeder is heavy, you may want to have someone help you with this procedure. Also, the document feeder is large, so be sure to allow adequate space around the scanner. Follow the steps below to install the automatic document feeder on your scanner: 1. Make sure your scanner is turned off and unplug the cables. 2. Remove your scanner's document cover by grasping the back of the cover as shown and easing the cover up. 3. Make sure the document table is clean and dust free. 4. Position the automatic document feeder's mounting slots over the two mounting Don't remove the foam screws located at the back of the block until you're done scanner. Slide the automatic installing the unit. document feeder forward slightly until the two holes in front of these slots are aligned with the screw holes at the back of the scanner. Using Optional Equipment 105
-
 1
1 -
2
-
3
-
4
-
5
-
6
-
7
-
8
-
9
-
10
-
11
-
12
-
13
-
14
-
15
-
16
-
17
-
18
-
19
-
20
-
21
-
22
-
23
-
24
-
25
-
26
-
27
-
28
-
29
-
30
-
31
-
32
-
33
-
34
-
35
-
36
-
37
-
38
-
39
-
40
-
41
-
42
-
43
-
44
-
45
-
46
-
47
-
48
-
49
-
50
-
51
-
52
-
53
-
54
-
55
-
56
-
57
-
58
-
59
-
60
-
61
-
62
-
63
-
64
-
65
-
66
-
67
-
68
-
69
-
70
-
71
-
72
-
73
-
74
-
75
-
76
-
77
-
78
-
79
-
80
-
81
-
82
-
83
-
84
-
85
-
86
-
87
-
88
-
89
-
90
-
91
-
92
-
93
-
94
-
95
-
96
-
97
-
98
-
99
-
100
-
101
-
102
-
103
-
104
-
105
-
106
-
 107
107 -
 108
108 -
 109
109 -
 110
110 -
 111
111 -
 112
112 -
 113
113 -
 114
114 -
 115
115 -
 116
116 -
 117
117 -
118
-
119
-
120
-
121
-
122
-
123
-
124
-
125
-
126
-
127
-
128
-
129
-
130
-
131
-
132
-
133
-
134
-
135
-
136
-
137
-
138
-
139
-
140
-
141
-
142
-
143
-
144
-
145
-
146
-
147
-
148
-
149
-
150
-
151
-
152
-
153
-
154
-
155
-
156
-
157
-
158
-
159
 |
 |