Epson Expression 1680 Special Edition User Manual (w/EPSON TWAIN software) - Page 133
can only scan a few dots., t scan, or
 |
View all Epson Expression 1680 Special Edition manuals
Add to My Manuals
Save this manual to your list of manuals |
Page 133 highlights
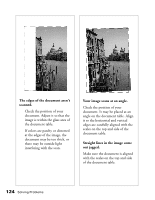
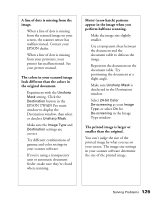
You can't print scanned images, or the printed image looks garbled. s Make sure your printer is securely connected to your computer and that you're using the correct cable. s Make sure the correct printer is selected in your printer software. OCR scanning produces poor character recognition. s Select OCR as both the Image Type and Destination. s Select Text Enhancement Technology for the Black and White Option in the Image Type window. s Adjust the Threshold setting in the Image Controls window. The image doesn't scan, or you can only scan a few dots. s Make sure the document is face down on the document table. s If you're using an automatic document feeder, make sure the original document is inserted face up. s If you've selected OCR as your Image Type, select None for the Black and White Option 126 Solving Problems in the Image Type window. Then adjust the Threshold setting in the Image Controls window. Or try changing the Image Type from OCR to Line Art, then adjust the Threshold setting. You're using a transparency unit, and the colors of your negative film preview look strange. s Make sure you've selected TPU for Neg. Film as your Document Source. s The scanner perceives the film guide's frame as white, which alters the exposure of the scanning area and makes the preview appear darker. To see the correct colors, do a zoom preview on an area toward the center of an image. s If you see light vertical lines on the scanned image, the TPU calibration area may contain dirt or dust. Clean the calibration area with a lint free cloth.
-
 1
1 -
2
-
3
-
4
-
5
-
6
-
7
-
8
-
9
-
10
-
11
-
12
-
13
-
14
-
15
-
16
-
17
-
18
-
19
-
20
-
21
-
22
-
23
-
24
-
25
-
26
-
27
-
28
-
29
-
30
-
31
-
32
-
33
-
34
-
35
-
36
-
37
-
38
-
39
-
40
-
41
-
42
-
43
-
44
-
45
-
46
-
47
-
48
-
49
-
50
-
51
-
52
-
53
-
54
-
55
-
56
-
57
-
58
-
59
-
60
-
61
-
62
-
63
-
64
-
65
-
66
-
67
-
68
-
69
-
70
-
71
-
72
-
73
-
74
-
75
-
76
-
77
-
78
-
79
-
80
-
81
-
82
-
83
-
84
-
85
-
86
-
87
-
88
-
89
-
90
-
91
-
92
-
93
-
94
-
95
-
96
-
97
-
98
-
99
-
100
-
101
-
102
-
103
-
104
-
105
-
106
-
107
-
108
-
109
-
110
-
111
-
112
-
113
-
114
-
115
-
116
-
117
-
118
-
119
-
120
-
121
-
122
-
123
-
124
-
125
-
126
-
127
-
 128
128 -
 129
129 -
 130
130 -
 131
131 -
 132
132 -
 133
133 -
 134
134 -
 135
135 -
 136
136 -
 137
137 -
 138
138 -
139
-
140
-
141
-
142
-
143
-
144
-
145
-
146
-
147
-
148
-
149
-
150
-
151
-
152
-
153
-
154
-
155
-
156
-
157
-
158
-
159
 |
 |