Epson Expression 1680 Special Edition User Manual (w/EPSON TWAIN software) - Page 60
Chap 3-How To Scan, Scanning Tips, Selecting Resolution
 |
View all Epson Expression 1680 Special Edition manuals
Add to My Manuals
Save this manual to your list of manuals |
Page 60 highlights
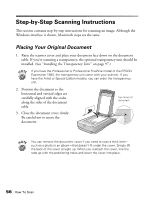
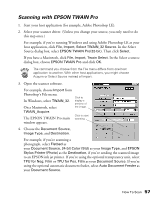
Chapter 3 How To Scan This section gives you an overview of the scanning process and some tips for getting the best scan. It also includes step-by-step scanning instructions. Scanning Tips Getting the best scan possible depends on several factors, including the quality of your original and the resolution you select. The better your original is, the better your scan will be. While you can make some color corrections in your scanning software, you'll need to do any major color photo retouching in a program such as Adobe Photoshop. To get the best possible scan, keep the document table clean, and make sure the document is flat against the glass surface. Selecting Resolution Resolution refers to how many dots per inch (dpi) or dots per centimeter (dpcm) your image contains. The best resolution for a scanned image depends on the type of image you're scanning and your final output device. As a rule of thumb for most images except line art, use a scanning resolution that is approximately one third of your output resolution. For example, use a scanning resolution up to 100 dpi with a 300 dpi laser printer, and up to 200 dpi with a 600 dpi laser printer. For 1440 dpi ink jet printers, such as the EPSON Stylus® Color series, use a scanning resolution of up to 300 dpi. Try a scanning resolution of 240 dpi for 720 dpi printing. 53
-
 1
1 -
2
-
3
-
4
-
5
-
6
-
7
-
8
-
9
-
10
-
11
-
12
-
13
-
14
-
15
-
16
-
17
-
18
-
19
-
20
-
21
-
22
-
23
-
24
-
25
-
26
-
27
-
28
-
29
-
30
-
31
-
32
-
33
-
34
-
35
-
36
-
37
-
38
-
39
-
40
-
41
-
42
-
43
-
44
-
45
-
46
-
47
-
48
-
49
-
50
-
51
-
52
-
53
-
54
-
 55
55 -
 56
56 -
 57
57 -
 58
58 -
 59
59 -
 60
60 -
 61
61 -
 62
62 -
 63
63 -
 64
64 -
 65
65 -
66
-
67
-
68
-
69
-
70
-
71
-
72
-
73
-
74
-
75
-
76
-
77
-
78
-
79
-
80
-
81
-
82
-
83
-
84
-
85
-
86
-
87
-
88
-
89
-
90
-
91
-
92
-
93
-
94
-
95
-
96
-
97
-
98
-
99
-
100
-
101
-
102
-
103
-
104
-
105
-
106
-
107
-
108
-
109
-
110
-
111
-
112
-
113
-
114
-
115
-
116
-
117
-
118
-
119
-
120
-
121
-
122
-
123
-
124
-
125
-
126
-
127
-
128
-
129
-
130
-
131
-
132
-
133
-
134
-
135
-
136
-
137
-
138
-
139
-
140
-
141
-
142
-
143
-
144
-
145
-
146
-
147
-
148
-
149
-
150
-
151
-
152
-
153
-
154
-
155
-
156
-
157
-
158
-
159
 |
 |