Epson RX500 User's Guide - Page 109
Maintaining the RX500, Cleaning the Print Head - printer error
 |
UPC - 010343848467
View all Epson RX500 manuals
Add to My Manuals
Save this manual to your list of manuals |
Page 109 highlights
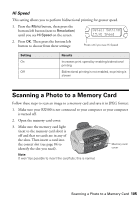
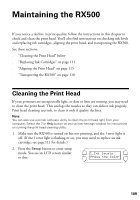
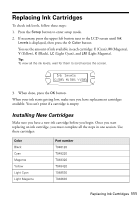
Maintaining the RX500 If you notice a decline in print quality, follow the instructions in this chapter to check and clean the print head. You'll also find instructions on checking ink levels and replacing ink cartridges, aligning the print head, and transporting the RX500. See these sections: ■ "Cleaning the Print Head" below ■ "Replacing Ink Cartridges" on page 111 ■ "Aligning the Print Head" on page 115 ■ "Transporting the RX500" on page 118 Cleaning the Print Head If your printouts are unexpectedly light, or dots or lines are missing, you may need to clean the print head. This unclogs the nozzles so they can deliver ink properly. Print head cleaning uses ink, so clean it only if quality declines. Note: You can also use a printer software utility to clean the print head right from your computer. Select the ? or Help button on your printer settings window for instructions on running the print head cleaning utility. 1. Make sure the RX500 is turned on but not printing, and the ! error light is off. (If the ! error light is flashing or on, you may need to replace an ink cartridge; see page 111 for details.) 2. Press the Setup button to enter setup mode. You see an LCD screen similar to this: 1.Ink levels Press the Color 109
-
 1
1 -
2
-
3
-
4
-
5
-
6
-
7
-
8
-
9
-
10
-
11
-
12
-
13
-
14
-
15
-
16
-
17
-
18
-
19
-
20
-
21
-
22
-
23
-
24
-
25
-
26
-
27
-
28
-
29
-
30
-
31
-
32
-
33
-
34
-
35
-
36
-
37
-
38
-
39
-
40
-
41
-
42
-
43
-
44
-
45
-
46
-
47
-
48
-
49
-
50
-
51
-
52
-
53
-
54
-
55
-
56
-
57
-
58
-
59
-
60
-
61
-
62
-
63
-
64
-
65
-
66
-
67
-
68
-
69
-
70
-
71
-
72
-
73
-
74
-
75
-
76
-
77
-
78
-
79
-
80
-
81
-
82
-
83
-
84
-
85
-
86
-
87
-
88
-
89
-
90
-
91
-
92
-
93
-
94
-
95
-
96
-
97
-
98
-
99
-
100
-
101
-
102
-
103
-
 104
104 -
 105
105 -
 106
106 -
 107
107 -
 108
108 -
 109
109 -
 110
110 -
 111
111 -
 112
112 -
 113
113 -
 114
114 -
115
-
116
-
117
-
118
-
119
-
120
-
121
-
122
-
123
-
124
-
125
-
126
-
127
-
128
-
129
-
130
-
131
-
132
-
133
-
134
-
135
-
136
-
137
-
138
 |
 |
