Epson RX500 User's Guide - Page 63
Scanning From a Program
 |
UPC - 010343848467
View all Epson RX500 manuals
Add to My Manuals
Save this manual to your list of manuals |
Page 63 highlights
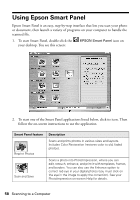
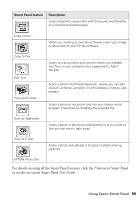
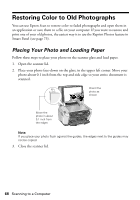
Scanning From a Program You can scan from any TWAIN-compliant program-such as Adobe® Photoshop® or ArcSoft PhotoImpression-using Epson Scan. Epson Scan provides three scanning modes for progressive levels of control over your scanned image: ■ Full Auto Mode makes scanning quick and easy, with automatic image type and resolution settings. ■ Home Mode provides a simple screen giving you automatic image adjustments, previewing and cropping capability, and preset configurations for various types of scans. Includes Color Restoration. ■ Professional Mode lets you manually configure advanced image settings, including Color Restoration. Use this mode if you have experience scanning and are familiar with color and image adjustments. Note: Epson Scan starts in the mode you used last, but you can change the mode at any time. Tip: You can restore color in your old photos. See page 68 for details. 1. Open the scanner lid. 2. Place your photo or document face down on the scanner glass, in the upper left corner. Move your document about 0.1 inch from the top and side edge so your entire document is scanned. Note: You can also place additional small documents or photos and scan them at the same time. Orient the photo as shown Move the photo in about 0.1 inch from the edges Scanning From a Program 63
-
 1
1 -
2
-
3
-
4
-
5
-
6
-
7
-
8
-
9
-
10
-
11
-
12
-
13
-
14
-
15
-
16
-
17
-
18
-
19
-
20
-
21
-
22
-
23
-
24
-
25
-
26
-
27
-
28
-
29
-
30
-
31
-
32
-
33
-
34
-
35
-
36
-
37
-
38
-
39
-
40
-
41
-
42
-
43
-
44
-
45
-
46
-
47
-
48
-
49
-
50
-
51
-
52
-
53
-
54
-
55
-
56
-
57
-
 58
58 -
 59
59 -
 60
60 -
 61
61 -
 62
62 -
 63
63 -
 64
64 -
 65
65 -
 66
66 -
 67
67 -
 68
68 -
69
-
70
-
71
-
72
-
73
-
74
-
75
-
76
-
77
-
78
-
79
-
80
-
81
-
82
-
83
-
84
-
85
-
86
-
87
-
88
-
89
-
90
-
91
-
92
-
93
-
94
-
95
-
96
-
97
-
98
-
99
-
100
-
101
-
102
-
103
-
104
-
105
-
106
-
107
-
108
-
109
-
110
-
111
-
112
-
113
-
114
-
115
-
116
-
117
-
118
-
119
-
120
-
121
-
122
-
123
-
124
-
125
-
126
-
127
-
128
-
129
-
130
-
131
-
132
-
133
-
134
-
135
-
136
-
137
-
138
 |
 |
