Epson RX500 User's Guide - Page 43
Printing on a Macintosh, Printing With OS X - stylus photo all in one printer
 |
UPC - 010343848467
View all Epson RX500 manuals
Add to My Manuals
Save this manual to your list of manuals |
Page 43 highlights
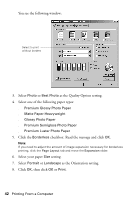
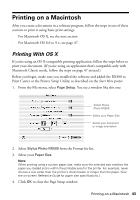
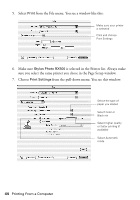
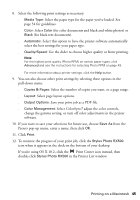
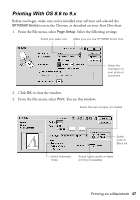
Printing on a Macintosh After you create a document in a software program, follow the steps in one of these sections to print it using basic print settings: ■ For Macintosh OS X, see the next section. ■ For Macintosh OS 8.6 to 9.x, see page 47. Printing With OS X If you're using an OS X-compatible printing application, follow the steps below to print your document. (If you're using an application that's compatible only with Macintosh Classic mode, follow the steps on page 47 instead.) Before you begin, make sure you installed the software and added the RX500 to Print Center or the Printer Setup Utility, as described on the Start Here poster. 1. From the File menu, select Page Setup. You see a window like this one: Select Stylus Photo RX500 Select your Paper Size Select your document or image orientation 2. Select Stylus Photo RX500 from the Format for list. 3. Select your Paper Size. Note: When printing using a custom paper size, make sure the selected size matches the paper you loaded and is within the printable area for the printer. For example, never choose a size wider than the printer's sheet feeder or longer than the paper. (See the on-screen Reference Guide for paper size specifications.) 4. Click OK to close the Page Setup window. Printing on a Macintosh 43
-
 1
1 -
2
-
3
-
4
-
5
-
6
-
7
-
8
-
9
-
10
-
11
-
12
-
13
-
14
-
15
-
16
-
17
-
18
-
19
-
20
-
21
-
22
-
23
-
24
-
25
-
26
-
27
-
28
-
29
-
30
-
31
-
32
-
33
-
34
-
35
-
36
-
37
-
 38
38 -
 39
39 -
 40
40 -
 41
41 -
 42
42 -
 43
43 -
 44
44 -
 45
45 -
 46
46 -
 47
47 -
 48
48 -
49
-
50
-
51
-
52
-
53
-
54
-
55
-
56
-
57
-
58
-
59
-
60
-
61
-
62
-
63
-
64
-
65
-
66
-
67
-
68
-
69
-
70
-
71
-
72
-
73
-
74
-
75
-
76
-
77
-
78
-
79
-
80
-
81
-
82
-
83
-
84
-
85
-
86
-
87
-
88
-
89
-
90
-
91
-
92
-
93
-
94
-
95
-
96
-
97
-
98
-
99
-
100
-
101
-
102
-
103
-
104
-
105
-
106
-
107
-
108
-
109
-
110
-
111
-
112
-
113
-
114
-
115
-
116
-
117
-
118
-
119
-
120
-
121
-
122
-
123
-
124
-
125
-
126
-
127
-
128
-
129
-
130
-
131
-
132
-
133
-
134
-
135
-
136
-
137
-
138
 |
 |
