Epson RX500 User's Guide - Page 111
Replacing Ink Cartridges, Installing New Cartridges - parts
 |
UPC - 010343848467
View all Epson RX500 manuals
Add to My Manuals
Save this manual to your list of manuals |
Page 111 highlights
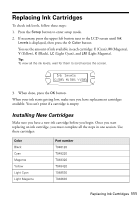
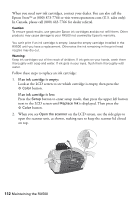
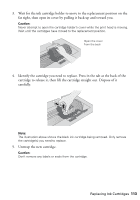
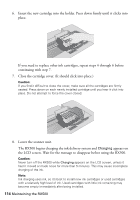
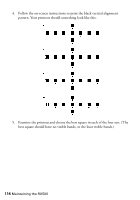
Replacing Ink Cartridges To check ink levels, follow these steps: 1. Press the Setup button to enter setup mode. 2. If necessary, press the upper left button next to the LCD screen until Ink Levels is displayed, then press the x Color button. You see the amount of ink available in each cartridge: C (Cyan), M (Magenta), Y (Yellow), K (Black), LC (Light Cyan), and LM (Light Magenta). Tip: To view all the ink levels, wait for them to scroll across the screen. Ink levels C:50% M:50% Y:50% 3. When done, press the OK button. When your ink starts getting low, make sure you have replacement cartridges available. You can't print if a cartridge is empty. Installing New Cartridges Make sure you have a new ink cartridge before you begin. Once you start replacing an ink cartridge, you must complete all the steps in one session. Use these cartridges: Color Black Cyan Magenta Yellow Light Cyan Light Magenta Part number T048120 T048220 T048320 T048420 T048520 T048620 Replacing Ink Cartridges 111
-
 1
1 -
2
-
3
-
4
-
5
-
6
-
7
-
8
-
9
-
10
-
11
-
12
-
13
-
14
-
15
-
16
-
17
-
18
-
19
-
20
-
21
-
22
-
23
-
24
-
25
-
26
-
27
-
28
-
29
-
30
-
31
-
32
-
33
-
34
-
35
-
36
-
37
-
38
-
39
-
40
-
41
-
42
-
43
-
44
-
45
-
46
-
47
-
48
-
49
-
50
-
51
-
52
-
53
-
54
-
55
-
56
-
57
-
58
-
59
-
60
-
61
-
62
-
63
-
64
-
65
-
66
-
67
-
68
-
69
-
70
-
71
-
72
-
73
-
74
-
75
-
76
-
77
-
78
-
79
-
80
-
81
-
82
-
83
-
84
-
85
-
86
-
87
-
88
-
89
-
90
-
91
-
92
-
93
-
94
-
95
-
96
-
97
-
98
-
99
-
100
-
101
-
102
-
103
-
104
-
105
-
 106
106 -
 107
107 -
 108
108 -
 109
109 -
 110
110 -
 111
111 -
 112
112 -
 113
113 -
 114
114 -
 115
115 -
 116
116 -
117
-
118
-
119
-
120
-
121
-
122
-
123
-
124
-
125
-
126
-
127
-
128
-
129
-
130
-
131
-
132
-
133
-
134
-
135
-
136
-
137
-
138
 |
 |
