Epson RX500 User's Guide - Page 68
Restoring Color to Old Photographs, Placing Your Photo and Loading Paper
 |
UPC - 010343848467
View all Epson RX500 manuals
Add to My Manuals
Save this manual to your list of manuals |
Page 68 highlights
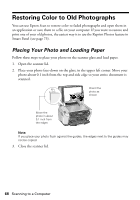
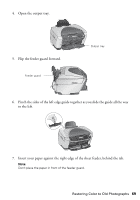
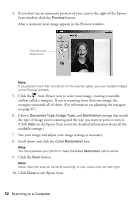
Restoring Color to Old Photographs You can use Epson Scan to restore color to faded photographs and open them in an application or save them to a file on your computer. If you want to restore and print one of your old photos, the easiest way is to use the Reprint Photos feature in Smart Panel (see page 73). Placing Your Photo and Loading Paper Follow these steps to place your photo on the scanner glass and load paper. 1. Open the scanner lid. 2. Place your photo face-down on the glass, in the upper left corner. Move your photo about 0.1 inch from the top and side edge so your entire document is scanned. Orient the photo as shown Move the photo in about 0.1 inch from the edges Note: If you place your photo flush against the guides, the edges next to the guides may not be copied. 3. Close the scanner lid. 68 Scanning to a Computer
-
 1
1 -
2
-
3
-
4
-
5
-
6
-
7
-
8
-
9
-
10
-
11
-
12
-
13
-
14
-
15
-
16
-
17
-
18
-
19
-
20
-
21
-
22
-
23
-
24
-
25
-
26
-
27
-
28
-
29
-
30
-
31
-
32
-
33
-
34
-
35
-
36
-
37
-
38
-
39
-
40
-
41
-
42
-
43
-
44
-
45
-
46
-
47
-
48
-
49
-
50
-
51
-
52
-
53
-
54
-
55
-
56
-
57
-
58
-
59
-
60
-
61
-
62
-
 63
63 -
 64
64 -
 65
65 -
 66
66 -
 67
67 -
 68
68 -
 69
69 -
 70
70 -
 71
71 -
 72
72 -
 73
73 -
74
-
75
-
76
-
77
-
78
-
79
-
80
-
81
-
82
-
83
-
84
-
85
-
86
-
87
-
88
-
89
-
90
-
91
-
92
-
93
-
94
-
95
-
96
-
97
-
98
-
99
-
100
-
101
-
102
-
103
-
104
-
105
-
106
-
107
-
108
-
109
-
110
-
111
-
112
-
113
-
114
-
115
-
116
-
117
-
118
-
119
-
120
-
121
-
122
-
123
-
124
-
125
-
126
-
127
-
128
-
129
-
130
-
131
-
132
-
133
-
134
-
135
-
136
-
137
-
138
 |
 |
