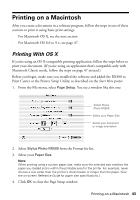
Epson RX500 User's Guide - Page 48
layouts, or add a watermark., to reduce or enlarge your printed image, print multi-
 |
UPC - 010343848467
View all Epson RX500 manuals
Add to My Manuals
Save this manual to your list of manuals |
Page 48 highlights
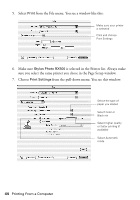
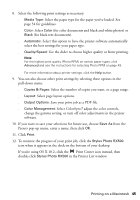
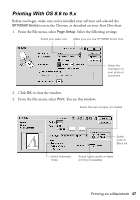
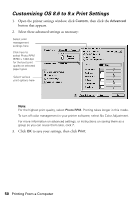
4. Select the following print settings as necessary: ■ Media Type: Select the paper type you loaded; see page 54 for guidelines. ■ Color: Select either Color (for color documents and black and white photos) or Black (for black text documents). ■ Automatic: Select this Mode option to have the printer software automatically select the best settings for your paper type. ■ Quality/Speed: Use the slider to choose higher quality or faster printing. Note: To select the highest print quality (Photo RPM) on selected papers, see page 50. For more information about print settings, click the ? button. 5. You can also do the following: ■ Click to reduce or enlarge your printed image, print multi-page layouts, or add a watermark. ■ Click to control background printing and schedule print jobs. ■ Click , then click Preview to preview your print job. ■ Click to check your ink levels. 6. Click Print. 7. If you turned on background printing, you can select EPSON Monitor IV from the Macintosh Application menu. You see this window: Select your print job, then click here to cancel printing Note: If you're not using background printing and you need to cancel printing, hold down the J key and press and hold the . (period) key. 48 Printing From a Computer
-
 1
1 -
2
-
3
-
4
-
5
-
6
-
7
-
8
-
9
-
10
-
11
-
12
-
13
-
14
-
15
-
16
-
17
-
18
-
19
-
20
-
21
-
22
-
23
-
24
-
25
-
26
-
27
-
28
-
29
-
30
-
31
-
32
-
33
-
34
-
35
-
36
-
37
-
38
-
39
-
40
-
41
-
42
-
 43
43 -
 44
44 -
 45
45 -
 46
46 -
 47
47 -
 48
48 -
 49
49 -
 50
50 -
 51
51 -
 52
52 -
 53
53 -
54
-
55
-
56
-
57
-
58
-
59
-
60
-
61
-
62
-
63
-
64
-
65
-
66
-
67
-
68
-
69
-
70
-
71
-
72
-
73
-
74
-
75
-
76
-
77
-
78
-
79
-
80
-
81
-
82
-
83
-
84
-
85
-
86
-
87
-
88
-
89
-
90
-
91
-
92
-
93
-
94
-
95
-
96
-
97
-
98
-
99
-
100
-
101
-
102
-
103
-
104
-
105
-
106
-
107
-
108
-
109
-
110
-
111
-
112
-
113
-
114
-
115
-
116
-
117
-
118
-
119
-
120
-
121
-
122
-
123
-
124
-
125
-
126
-
127
-
128
-
129
-
130
-
131
-
132
-
133
-
134
-
135
-
136
-
137
-
138
 |
 |
