Epson RX500 User's Guide - Page 114
Close the cartridge cover. It should click into place., Lower the scanner unit.
 |
UPC - 010343848467
View all Epson RX500 manuals
Add to My Manuals
Save this manual to your list of manuals |
Page 114 highlights
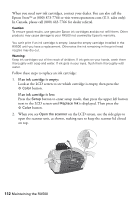
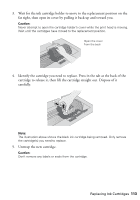
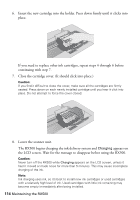
6. Insert the new cartridge into the holder. Press down firmly until it clicks into place. If you need to replace other ink cartridges, repeat steps 4 through 6 before continuing with step 7. 7. Close the cartridge cover. (It should click into place.) Caution: If you find it difficult to close the cover, make sure all the cartridges are firmly seated. Press down on each newly installed cartridge until you hear it click into place. Do not attempt to force the cover closed. 8. Lower the scanner unit. The RX500 begins charging the ink delivery system and Charging appears on the LCD screen. Wait for the message to disappear before using the RX500. Caution: Never turn off the RX500 while Charging appears on the LCD screen, unless it hasn't moved or made noise for more than 5 minutes. This may cause incomplete charging of the ink. Note: Ink charging uses ink, so it's best to install new ink cartridges or used cartridges with a relatively high level of ink. Used cartridges with little ink remaining may become empty immediately after being installed. 114 Maintaining the RX500
-
 1
1 -
2
-
3
-
4
-
5
-
6
-
7
-
8
-
9
-
10
-
11
-
12
-
13
-
14
-
15
-
16
-
17
-
18
-
19
-
20
-
21
-
22
-
23
-
24
-
25
-
26
-
27
-
28
-
29
-
30
-
31
-
32
-
33
-
34
-
35
-
36
-
37
-
38
-
39
-
40
-
41
-
42
-
43
-
44
-
45
-
46
-
47
-
48
-
49
-
50
-
51
-
52
-
53
-
54
-
55
-
56
-
57
-
58
-
59
-
60
-
61
-
62
-
63
-
64
-
65
-
66
-
67
-
68
-
69
-
70
-
71
-
72
-
73
-
74
-
75
-
76
-
77
-
78
-
79
-
80
-
81
-
82
-
83
-
84
-
85
-
86
-
87
-
88
-
89
-
90
-
91
-
92
-
93
-
94
-
95
-
96
-
97
-
98
-
99
-
100
-
101
-
102
-
103
-
104
-
105
-
106
-
107
-
108
-
 109
109 -
 110
110 -
 111
111 -
 112
112 -
 113
113 -
 114
114 -
 115
115 -
 116
116 -
 117
117 -
 118
118 -
 119
119 -
120
-
121
-
122
-
123
-
124
-
125
-
126
-
127
-
128
-
129
-
130
-
131
-
132
-
133
-
134
-
135
-
136
-
137
-
138
 |
 |
