Epson RX500 User's Guide - Page 39
Customizing Windows Print Settings
 |
UPC - 010343848467
View all Epson RX500 manuals
Add to My Manuals
Save this manual to your list of manuals |
Page 39 highlights
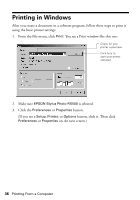
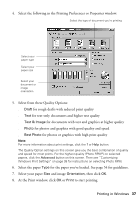
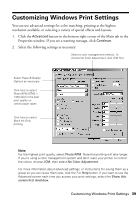
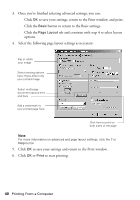
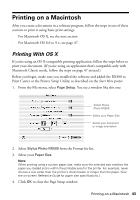
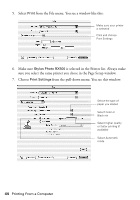
Customizing Windows Print Settings You can use advanced settings for color matching, printing at the highest resolution available, or selecting a variety of special effects and layouts. 1. Click the Advanced button in the bottom right corner of the Main tab in the Properties window. If you see a warning message, click Continue. 2. Select the following settings as necessary: Select a color management method. To choose No Color Adjustment, click ICM first Select Paper & Quality Options as necessary Click here to select Photo RPM (5760 × 1440 dpi) for the best print quality on certain paper types Click here to select Black Ink Only printing Note: For the highest print quality, select Photo RPM. Note that printing will take longer. If you're using a color management system and don't want your printer to control the colors, choose, ICM, then select No Color Adjustment. For more information about advanced settings, or instructions for saving them as a group so you can reuse them later, click the ? or Help button. If you want to use the Advanced screen each time you access your print settings, select the Show this screen first checkbox. Customizing Windows Print Settings 39
-
 1
1 -
2
-
3
-
4
-
5
-
6
-
7
-
8
-
9
-
10
-
11
-
12
-
13
-
14
-
15
-
16
-
17
-
18
-
19
-
20
-
21
-
22
-
23
-
24
-
25
-
26
-
27
-
28
-
29
-
30
-
31
-
32
-
33
-
 34
34 -
 35
35 -
 36
36 -
 37
37 -
 38
38 -
 39
39 -
 40
40 -
 41
41 -
 42
42 -
 43
43 -
 44
44 -
45
-
46
-
47
-
48
-
49
-
50
-
51
-
52
-
53
-
54
-
55
-
56
-
57
-
58
-
59
-
60
-
61
-
62
-
63
-
64
-
65
-
66
-
67
-
68
-
69
-
70
-
71
-
72
-
73
-
74
-
75
-
76
-
77
-
78
-
79
-
80
-
81
-
82
-
83
-
84
-
85
-
86
-
87
-
88
-
89
-
90
-
91
-
92
-
93
-
94
-
95
-
96
-
97
-
98
-
99
-
100
-
101
-
102
-
103
-
104
-
105
-
106
-
107
-
108
-
109
-
110
-
111
-
112
-
113
-
114
-
115
-
116
-
117
-
118
-
119
-
120
-
121
-
122
-
123
-
124
-
125
-
126
-
127
-
128
-
129
-
130
-
131
-
132
-
133
-
134
-
135
-
136
-
137
-
138
 |
 |
