Epson RX500 User's Guide - Page 23
button for color copies or, button for black - not printing black
 |
UPC - 010343848467
View all Epson RX500 manuals
Add to My Manuals
Save this manual to your list of manuals |
Page 23 highlights
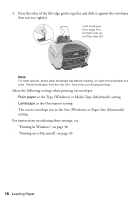
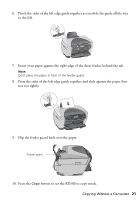
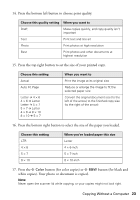
14. Press the bottom left button to choose print quality. Choose this quality setting When you want to Draft Make copies quickly, and copy quality isn't important Text Print text and line art Photo Print photos at high resolution Best Print photos and other documents at highest resolution 15. Press the top right button to set the size of your printed copy. Choose this setting Actual Auto Fit Page Letter ! 4 × 6 4 × 6 ! Letter Letter ! 5 × 7 5 × 7 ! Letter 4 × 6 ! 8 × 10 8 × 10 ! 5 × 7 When you want to Print the image at its original size Reduce or enlarge the image to fit the selected paper size Convert the original document size (to the left of the arrow) to the finished copy size (to the right of the arrow) 16. Press the bottom right button to select the size of the paper you loaded. Choose this setting LTR 4 × 6 5 × 7 8 × 10 When you've loaded paper this size Letter 4 × 6-inch 5 × 7-inch 8 × 10-inch 17. Press the x Color button (for color copies) or x B&W button (for black and white copies). Your photo or document is copied. Note: Never open the scanner lid while copying, or your copies might not look right. Copying Without a Computer 23
-
 1
1 -
2
-
3
-
4
-
5
-
6
-
7
-
8
-
9
-
10
-
11
-
12
-
13
-
14
-
15
-
16
-
17
-
 18
18 -
 19
19 -
 20
20 -
 21
21 -
 22
22 -
 23
23 -
 24
24 -
 25
25 -
 26
26 -
 27
27 -
 28
28 -
29
-
30
-
31
-
32
-
33
-
34
-
35
-
36
-
37
-
38
-
39
-
40
-
41
-
42
-
43
-
44
-
45
-
46
-
47
-
48
-
49
-
50
-
51
-
52
-
53
-
54
-
55
-
56
-
57
-
58
-
59
-
60
-
61
-
62
-
63
-
64
-
65
-
66
-
67
-
68
-
69
-
70
-
71
-
72
-
73
-
74
-
75
-
76
-
77
-
78
-
79
-
80
-
81
-
82
-
83
-
84
-
85
-
86
-
87
-
88
-
89
-
90
-
91
-
92
-
93
-
94
-
95
-
96
-
97
-
98
-
99
-
100
-
101
-
102
-
103
-
104
-
105
-
106
-
107
-
108
-
109
-
110
-
111
-
112
-
113
-
114
-
115
-
116
-
117
-
118
-
119
-
120
-
121
-
122
-
123
-
124
-
125
-
126
-
127
-
128
-
129
-
130
-
131
-
132
-
133
-
134
-
135
-
136
-
137
-
138
 |
 |
