Epson RX500 User's Guide - Page 93
Selecting Photos Using the Buttons on the RX500, Load the type of paper you want
 |
UPC - 010343848467
View all Epson RX500 manuals
Add to My Manuals
Save this manual to your list of manuals |
Page 93 highlights
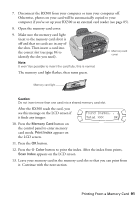
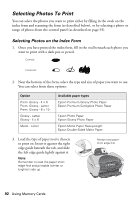
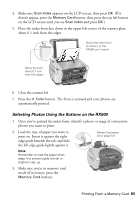
4. Make sure Scan Index appears on the LCD screen, then press OK. (If it doesn't appear, press the Memory Card button, then press the top left button on the LCD screen until you see Scan Index and press OK.) 5. Place the index form face down in the upper left corner of the scanner glass, about 0.1 inch from the edges. Orient the index form as shown, or the RX500 can't read it Move the form about 0.1 inch from the edges 6. Close the scanner lid. 7. Press the x Color button. The form is scanned and your photos are automatically printed. Selecting Photos Using the Buttons on the RX500 1. Once you've printed the index form, identify a photo or range of consecutive photos you want to print. 2. Load the type of paper you want to print on. Insert it against the right edge guide beneath the tab, and slide the left edge guide lightly against it. Always load paper short edge first Note: Remember to load the paper short edge first and printable (whiter or brighter) side up. 3. Make sure you're in memory card mode (if necessary, press the Memory Card button). Printing From a Memory Card 93
-
 1
1 -
2
-
3
-
4
-
5
-
6
-
7
-
8
-
9
-
10
-
11
-
12
-
13
-
14
-
15
-
16
-
17
-
18
-
19
-
20
-
21
-
22
-
23
-
24
-
25
-
26
-
27
-
28
-
29
-
30
-
31
-
32
-
33
-
34
-
35
-
36
-
37
-
38
-
39
-
40
-
41
-
42
-
43
-
44
-
45
-
46
-
47
-
48
-
49
-
50
-
51
-
52
-
53
-
54
-
55
-
56
-
57
-
58
-
59
-
60
-
61
-
62
-
63
-
64
-
65
-
66
-
67
-
68
-
69
-
70
-
71
-
72
-
73
-
74
-
75
-
76
-
77
-
78
-
79
-
80
-
81
-
82
-
83
-
84
-
85
-
86
-
87
-
 88
88 -
 89
89 -
 90
90 -
 91
91 -
 92
92 -
 93
93 -
 94
94 -
 95
95 -
 96
96 -
 97
97 -
 98
98 -
99
-
100
-
101
-
102
-
103
-
104
-
105
-
106
-
107
-
108
-
109
-
110
-
111
-
112
-
113
-
114
-
115
-
116
-
117
-
118
-
119
-
120
-
121
-
122
-
123
-
124
-
125
-
126
-
127
-
128
-
129
-
130
-
131
-
132
-
133
-
134
-
135
-
136
-
137
-
138
 |
 |
