Epson RX500 User's Guide - Page 80
To Photo Card, For Windows XP, if you see the screen below on your computer, select
 |
UPC - 010343848467
View all Epson RX500 manuals
Add to My Manuals
Save this manual to your list of manuals |
Page 80 highlights
4. Close the scanner lid. 5. Press the Scan button on the RX500 to switch to scan mode. You see this LCD screen: Press this button until you see To PC 1.To Photo Card OK 6. Press the top left button to select To PC. Then press the OK button. 7. For Windows XP, if you see the screen below on your computer, select EPSON Scan and click the Always use this program for this action box. Then click OK. Select this option Then select this box 8. When you see the File Save Settings window, type a name for your file in the Prefix box, select a file format in the Type box, and click OK. Epson Scan starts and scans your image to the location you specified. 80 Scanning to a Computer
-
 1
1 -
2
-
3
-
4
-
5
-
6
-
7
-
8
-
9
-
10
-
11
-
12
-
13
-
14
-
15
-
16
-
17
-
18
-
19
-
20
-
21
-
22
-
23
-
24
-
25
-
26
-
27
-
28
-
29
-
30
-
31
-
32
-
33
-
34
-
35
-
36
-
37
-
38
-
39
-
40
-
41
-
42
-
43
-
44
-
45
-
46
-
47
-
48
-
49
-
50
-
51
-
52
-
53
-
54
-
55
-
56
-
57
-
58
-
59
-
60
-
61
-
62
-
63
-
64
-
65
-
66
-
67
-
68
-
69
-
70
-
71
-
72
-
73
-
74
-
 75
75 -
 76
76 -
 77
77 -
 78
78 -
 79
79 -
 80
80 -
 81
81 -
 82
82 -
 83
83 -
 84
84 -
 85
85 -
86
-
87
-
88
-
89
-
90
-
91
-
92
-
93
-
94
-
95
-
96
-
97
-
98
-
99
-
100
-
101
-
102
-
103
-
104
-
105
-
106
-
107
-
108
-
109
-
110
-
111
-
112
-
113
-
114
-
115
-
116
-
117
-
118
-
119
-
120
-
121
-
122
-
123
-
124
-
125
-
126
-
127
-
128
-
129
-
130
-
131
-
132
-
133
-
134
-
135
-
136
-
137
-
138
 |
 |

80
Scanning to a Computer
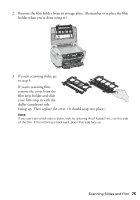
4.
Close the scanner lid.
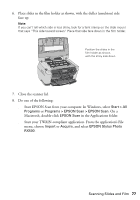
5.
Press the
Scan
button on the RX500 to switch to scan mode. You see this
LCD screen:
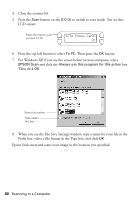
6.
Press the top left button to select
To PC
. Then press the
OK
button.
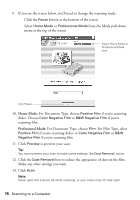
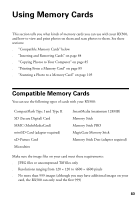
7.
For Windows XP, if you see the screen below on your computer, select
EPSON Scan
and click the
Always use this program for this action
box.
Then click
OK
.
8.
When you see the File Save Settings window, type a name for your file in the
Prefix box, select a file format in the Type box, and click
OK
.
Epson Scan starts and scans your image to the location you specified.
1.To Photo Card
OK
Press this button until
you see To PC
Select this option
Then select
this box