Epson RX500 User's Guide - Page 81
Scanning to E-Mail
 |
UPC - 010343848467
View all Epson RX500 manuals
Add to My Manuals
Save this manual to your list of manuals |
Page 81 highlights
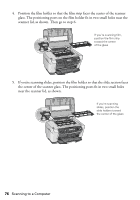
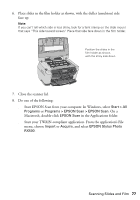
Scanning to E-Mail This section explains how to use the buttons on the RX500 to scan an image, transfer it to your e-mail program, and attach it to an e-mail. Note: You can also scan to e-mail by double-clicking the EPSON Smart Panel icon on your desktop and clicking the Scan to E-mail icon. See Smart Panel Help for details. 1. Make sure the RX500 is connected to your computer. 2. Open the scanner lid. 3. Place your photo face down on the glass in the upper left corner. Move it about 0.1 inch from the top and side edge so the entire photo is scanned. Orient the photo as shown Move the photo in about 0.1 inch from the edges Note: If you place your photo too close to the edges of the scanner glass, the edges may not be scanned. 4. Close the scanner lid. 5. Press the Scan button on the RX500 to switch to scan mode. You see this LCD screen: Press this button until you see To E-Mail 1.To Photo Card OK 6. Press the top left button to select To E-mail. Then press the OK button. Scanning Using the RX500 Buttons 81
-
 1
1 -
2
-
3
-
4
-
5
-
6
-
7
-
8
-
9
-
10
-
11
-
12
-
13
-
14
-
15
-
16
-
17
-
18
-
19
-
20
-
21
-
22
-
23
-
24
-
25
-
26
-
27
-
28
-
29
-
30
-
31
-
32
-
33
-
34
-
35
-
36
-
37
-
38
-
39
-
40
-
41
-
42
-
43
-
44
-
45
-
46
-
47
-
48
-
49
-
50
-
51
-
52
-
53
-
54
-
55
-
56
-
57
-
58
-
59
-
60
-
61
-
62
-
63
-
64
-
65
-
66
-
67
-
68
-
69
-
70
-
71
-
72
-
73
-
74
-
75
-
 76
76 -
 77
77 -
 78
78 -
 79
79 -
 80
80 -
 81
81 -
 82
82 -
 83
83 -
 84
84 -
 85
85 -
 86
86 -
87
-
88
-
89
-
90
-
91
-
92
-
93
-
94
-
95
-
96
-
97
-
98
-
99
-
100
-
101
-
102
-
103
-
104
-
105
-
106
-
107
-
108
-
109
-
110
-
111
-
112
-
113
-
114
-
115
-
116
-
117
-
118
-
119
-
120
-
121
-
122
-
123
-
124
-
125
-
126
-
127
-
128
-
129
-
130
-
131
-
132
-
133
-
134
-
135
-
136
-
137
-
138
 |
 |
