HTC EVO View 4G User Manual (Honeycomb) - Page 23
Getting Around Your Device, Touch, Press and hold - charger
 |
View all HTC EVO View 4G manuals
Add to My Manuals
Save this manual to your list of manuals |
Page 23 highlights
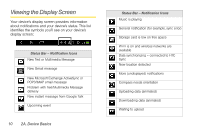
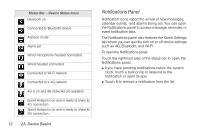
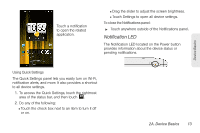
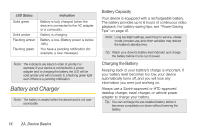
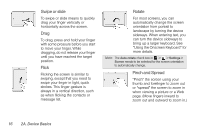
Device Basics 1. Plug the USB connector of the AC adapter into the charger/accessory jack at the bottom of your device. 2. Plug the AC adapter in to an electrical outlet to start charging the battery. Charging is indicated by a solid amber light in the Notification LED. As the battery is being charged while the device is on, the charging battery icon ( ) is displayed in the status bar. After the battery has been fully charged, the Notification LED shows a solid green light and a full battery icon ( ) is displayed in the status bar. For more information about Notifications, see "Notification LED" on page 13 for more details. Getting Around Your Device There are different ways to navigate around the your device's Home screen, menus, and application screens. Touch When you want to type using the onscreen keyboard, select items onscreen such as application and settings icons, or press onscreen buttons, touch them with your finger. Press and hold To open the available options for an item (for example, contact or link in a Web page), simply press and hold the item. 2A. Device Basics 15
-
 1
1 -
2
-
3
-
4
-
5
-
6
-
7
-
8
-
9
-
10
-
11
-
12
-
13
-
14
-
15
-
16
-
17
-
 18
18 -
 19
19 -
 20
20 -
 21
21 -
 22
22 -
 23
23 -
 24
24 -
 25
25 -
 26
26 -
 27
27 -
 28
28 -
29
-
30
-
31
-
32
-
33
-
34
-
35
-
36
-
37
-
38
-
39
-
40
-
41
-
42
-
43
-
44
-
45
-
46
-
47
-
48
-
49
-
50
-
51
-
52
-
53
-
54
-
55
-
56
-
57
-
58
-
59
-
60
-
61
-
62
-
63
-
64
-
65
-
66
-
67
-
68
-
69
-
70
-
71
-
72
-
73
-
74
-
75
-
76
-
77
-
78
-
79
-
80
-
81
-
82
-
83
-
84
-
85
-
86
-
87
-
88
-
89
-
90
-
91
-
92
-
93
-
94
-
95
-
96
-
97
-
98
-
99
-
100
-
101
-
102
-
103
-
104
-
105
-
106
-
107
-
108
-
109
-
110
-
111
-
112
-
113
-
114
-
115
-
116
-
117
-
118
-
119
-
120
-
121
-
122
-
123
-
124
-
125
-
126
-
127
-
128
-
129
-
130
-
131
-
132
-
133
-
134
-
135
-
136
-
137
-
138
-
139
-
140
-
141
-
142
-
143
-
144
-
145
-
146
-
147
-
148
-
149
-
150
-
151
-
152
-
153
-
154
-
155
-
156
-
157
-
158
-
159
-
160
-
161
-
162
-
163
-
164
-
165
-
166
-
167
-
168
-
169
-
170
-
171
-
172
-
173
-
174
-
175
-
176
-
177
-
178
-
179
-
180
-
181
-
182
-
183
-
184
-
185
-
186
-
187
-
188
-
189
-
190
-
191
-
192
-
193
-
194
-
195
-
196
-
197
-
198
-
199
-
200
-
201
-
202
-
203
-
204
-
205
-
206
-
207
-
208
-
209
-
210
-
211
-
212
-
213
-
214
-
215
-
216
-
217
-
218
-
219
-
220
-
221
-
222
-
223
-
224
-
225
-
226
-
227
-
228
-
229
 |
 |
