Kyocera KM-3530 Fax System (F) Operation Guide Rev1 - Page 126
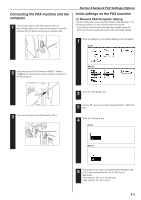
Connecting the FAX machine and the, computer, Initial settings on the FAX machine
 |
View all Kyocera KM-3530 manuals
Add to My Manuals
Save this manual to your list of manuals |
Page 126 highlights
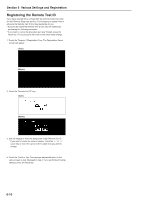
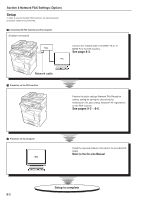
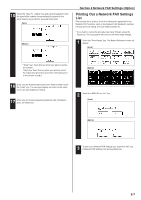
Connecting the FAX machine and the computer 1 Turn the main switch of the FAX machine OFF (O). Note: Always make sure to turn the main switch of the FAX machine OFF (O) before connecting the network cable. Section 8 Network FAX Settings (Option) Initial settings on the FAX machine (1) Network FAX Reception Setting Turn this setting ON in order to perform Network FAX Reception. The received documents can also be printed with this machine. * If you want to cancel the procedure part way through, press the Reset key. The touch panel will return to the initial mode settings. 1 Press the Default key. The Default Setting screen will appear. (Inch) 2 Insert the connector of an Ethernet 10BASE-T cable or 100BASE-TX cable into the scanner interface connector on the FAX machine. (Metric) 3 Turn the main switch of the FAX machine ON (|). 2 Touch the "FAX default" key. 3 Use the "M" cursor key to select "NetworkFAX Rx." ["NW-FAX RX"]. 4 Touch the "Change #" key. (Inch) (Metric) 5 Select whether you want to turn Network FAX Reception ON or OFF by touching either the "On" or "Off" key, as appropriate. If you selected "On", go to the next step. If you selected "Off", go to step 7. 8-3
-
 1
1 -
2
-
3
-
4
-
5
-
6
-
7
-
8
-
9
-
10
-
11
-
12
-
13
-
14
-
15
-
16
-
17
-
18
-
19
-
20
-
21
-
22
-
23
-
24
-
25
-
26
-
27
-
28
-
29
-
30
-
31
-
32
-
33
-
34
-
35
-
36
-
37
-
38
-
39
-
40
-
41
-
42
-
43
-
44
-
45
-
46
-
47
-
48
-
49
-
50
-
51
-
52
-
53
-
54
-
55
-
56
-
57
-
58
-
59
-
60
-
61
-
62
-
63
-
64
-
65
-
66
-
67
-
68
-
69
-
70
-
71
-
72
-
73
-
74
-
75
-
76
-
77
-
78
-
79
-
80
-
81
-
82
-
83
-
84
-
85
-
86
-
87
-
88
-
89
-
90
-
91
-
92
-
93
-
94
-
95
-
96
-
97
-
98
-
99
-
100
-
101
-
102
-
103
-
104
-
105
-
106
-
107
-
108
-
109
-
110
-
111
-
112
-
113
-
114
-
115
-
116
-
117
-
118
-
119
-
120
-
 121
121 -
 122
122 -
 123
123 -
 124
124 -
 125
125 -
 126
126 -
 127
127 -
 128
128 -
 129
129 -
 130
130 -
 131
131 -
132
-
133
-
134
-
135
-
136
-
137
-
138
-
139
-
140
-
141
-
142
-
143
-
144
-
145
-
146
 |
 |
