Kyocera KM-3530 Fax System (F) Operation Guide Rev1 - Page 54
Metric, Deleting fax numbers, Adding fax numbers, Changing fax numbers
 |
View all Kyocera KM-3530 manuals
Add to My Manuals
Save this manual to your list of manuals |
Page 54 highlights
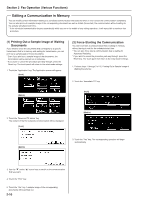
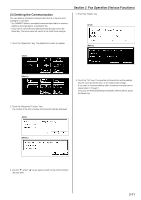
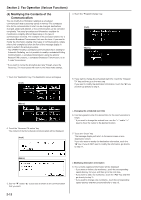
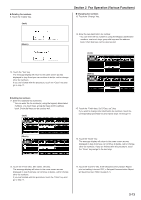
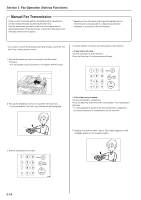
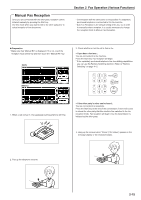
G Deleting fax numbers 9. Touch the "Delete" key. (Inch) (Metric) Section 2 Fax Operation (Various Functions) G Changing fax numbers 13. Touch the "Change" key. 14. Enter the new destination fax number. * You can enter the fax number(s) using the keypad, abbreviated numbers, one-touch keys, group dial keys and the address book. Chain dial keys can be used as well. (Inch) 10. Touch the "Yes" key. The message display will return to the same screen as was displayed in step 8 and you can continue to delete, add or change other fax numbers. If you are finished with this procedure, touch the "Close" key and go to step 17. (Metric) G Adding fax numbers 11. Enter the additional fax number(s). * You can enter the fax number(s) using the keypad, abbreviated numbers, one-touch keys, group dial keys and the address book. Chain dial keys can be used as well. (Inch) 15. Touch the "Finish dest. Set" ["Dest. set"] key. If you want to change other destination fax numbers, touch the corresponding speed-dial key and repeat steps 13 through 15. (Metric) 16. Touch the "Close" key. The message display will return to the same screen as was displayed in step 8 and you can continue to delete, add or change other fax numbers. If you are finished with this procedure, touch the "Close" key and go to the next step. 12. Touch the "Finish dest. Set" ["Dest. set"] key. The message display will return to the same screen as was displayed in step 8 and you can continue to delete, add or change other fax numbers. If you are finished with this procedure, touch the "Close" key and go to step 17. 17. Touch the "Confirm" key. If the Delayed Communication Report print out setting is turned "ON", a Delayed Communication Report will be printed out. (Refer to page 6-1.) 2-13
-
 1
1 -
2
-
3
-
4
-
5
-
6
-
7
-
8
-
9
-
10
-
11
-
12
-
13
-
14
-
15
-
16
-
17
-
18
-
19
-
20
-
21
-
22
-
23
-
24
-
25
-
26
-
27
-
28
-
29
-
30
-
31
-
32
-
33
-
34
-
35
-
36
-
37
-
38
-
39
-
40
-
41
-
42
-
43
-
44
-
45
-
46
-
47
-
48
-
 49
49 -
 50
50 -
 51
51 -
 52
52 -
 53
53 -
 54
54 -
 55
55 -
 56
56 -
 57
57 -
 58
58 -
 59
59 -
60
-
61
-
62
-
63
-
64
-
65
-
66
-
67
-
68
-
69
-
70
-
71
-
72
-
73
-
74
-
75
-
76
-
77
-
78
-
79
-
80
-
81
-
82
-
83
-
84
-
85
-
86
-
87
-
88
-
89
-
90
-
91
-
92
-
93
-
94
-
95
-
96
-
97
-
98
-
99
-
100
-
101
-
102
-
103
-
104
-
105
-
106
-
107
-
108
-
109
-
110
-
111
-
112
-
113
-
114
-
115
-
116
-
117
-
118
-
119
-
120
-
121
-
122
-
123
-
124
-
125
-
126
-
127
-
128
-
129
-
130
-
131
-
132
-
133
-
134
-
135
-
136
-
137
-
138
-
139
-
140
-
141
-
142
-
143
-
144
-
145
-
146
 |
 |
