Kyocera TASKalfa 4500i Fax System (V) Operation Guide - Page 210
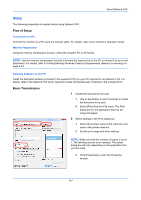
Setup, Flow of Setup, Basic Transmission - windows 7 driver
 |
View all Kyocera TASKalfa 4500i manuals
Add to My Manuals
Save this manual to your list of manuals |
Page 210 highlights
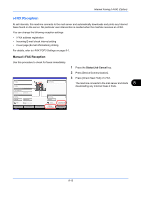
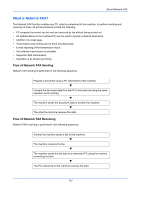
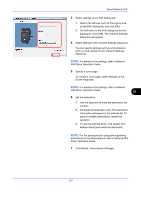
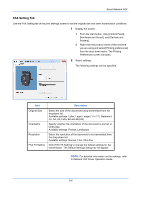
About Network FAX Setup The following preparation is needed before using Network FAX. Flow of Setup Connection to a PC Connect the machine to a PC using the network cable. For details, refer to the machine's Operation Guide. Machine Registration Using the memory transmission function, select the recipient PC or file format. NOTE: Use the memory transmission function to forward the received fax to the PC or forward it as an e-mail attachment. For details, refer to Printing/Sending Received Faxes by Requirements (Memory Forwarding) on page 4-18. Installing Software on the PC Install the dedicated software (included in the supplied DVD) on your PC required to use Network FAX. For details, refer to the Network FAX Driver Operation Guide (Online Manual) contained in the included DVD. Basic Transmission 1 Create the document to be sent. 1 Use an application on your computer to create the document to be sent. 2 Select [Print] from the File menu. The Print dialog box for the application that you are using will appear. 2 Select settings in the Print dialog box. 1 Select the product name of the machine to be used in the printer name list. 2 Set the print range and other settings. NOTE: Make sure that the number of copies is set to 1. The following screen is an example. The actual dialog box will vary depending on the application that you are using. 3 Click [Properties] to open the Properties window. 9-4
-
 1
1 -
2
-
3
-
4
-
5
-
6
-
7
-
8
-
9
-
10
-
11
-
12
-
13
-
14
-
15
-
16
-
17
-
18
-
19
-
20
-
21
-
22
-
23
-
24
-
25
-
26
-
27
-
28
-
29
-
30
-
31
-
32
-
33
-
34
-
35
-
36
-
37
-
38
-
39
-
40
-
41
-
42
-
43
-
44
-
45
-
46
-
47
-
48
-
49
-
50
-
51
-
52
-
53
-
54
-
55
-
56
-
57
-
58
-
59
-
60
-
61
-
62
-
63
-
64
-
65
-
66
-
67
-
68
-
69
-
70
-
71
-
72
-
73
-
74
-
75
-
76
-
77
-
78
-
79
-
80
-
81
-
82
-
83
-
84
-
85
-
86
-
87
-
88
-
89
-
90
-
91
-
92
-
93
-
94
-
95
-
96
-
97
-
98
-
99
-
100
-
101
-
102
-
103
-
104
-
105
-
106
-
107
-
108
-
109
-
110
-
111
-
112
-
113
-
114
-
115
-
116
-
117
-
118
-
119
-
120
-
121
-
122
-
123
-
124
-
125
-
126
-
127
-
128
-
129
-
130
-
131
-
132
-
133
-
134
-
135
-
136
-
137
-
138
-
139
-
140
-
141
-
142
-
143
-
144
-
145
-
146
-
147
-
148
-
149
-
150
-
151
-
152
-
153
-
154
-
155
-
156
-
157
-
158
-
159
-
160
-
161
-
162
-
163
-
164
-
165
-
166
-
167
-
168
-
169
-
170
-
171
-
172
-
173
-
174
-
175
-
176
-
177
-
178
-
179
-
180
-
181
-
182
-
183
-
184
-
185
-
186
-
187
-
188
-
189
-
190
-
191
-
192
-
193
-
194
-
195
-
196
-
197
-
198
-
199
-
200
-
201
-
202
-
203
-
204
-
 205
205 -
 206
206 -
 207
207 -
 208
208 -
 209
209 -
 210
210 -
 211
211 -
 212
212 -
 213
213 -
 214
214 -
 215
215 -
216
-
217
-
218
-
219
-
220
-
221
-
222
-
223
-
224
-
225
-
226
-
227
-
228
-
229
-
230
-
231
-
232
-
233
-
234
-
235
-
236
-
237
-
238
-
239
-
240
-
241
-
242
-
243
-
244
-
245
-
246
-
247
-
248
-
249
-
250
-
251
-
252
 |
 |