Kyocera TASKalfa 4500i Fax System (V) Operation Guide - Page 46
Placing Originals, Dial the Receiving System, FAX Operation Basic, Operation Guide
 |
View all Kyocera TASKalfa 4500i manuals
Add to My Manuals
Save this manual to your list of manuals |
Page 46 highlights
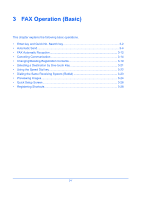
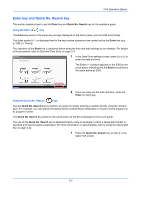
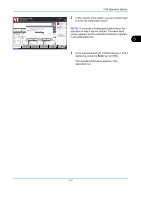
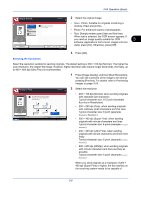
Placing Originals FAX Operation (Basic) Place the originals on the glass surface or in the optional document processor. Refer to the machine's Operation Guide for placing originals. Dial the Receiving System Enter Destination. ABCD Pause Space [email protected] Backspace Destination Address Book FAX No. Entry On Hook Direct Chain Detail Delete Recall 0001 0002 0003 0004 0005 No. AAA BBB CCC DDD EEE 0006 0007 0008 FFF GGG HHH III Destination Status Quick Setup Org./Sending Data Format 0009 0010 JJJ 1/100 Image Quality Advanced Setup Check Destinations Program 10/10/2010 10:10 1 Press [FAX No. Entry]. NOTE: When you press the numeric keys to enter numbers, the screen changes to the entry screen for the fax number (the screen shown in the next step). 2 Enter the fax number of the receiving system using the numeric keys. • If Entry Check for New Destination is Off, press [OK] to complete entering the number. • If Entry Check for New Destination is On, press [OK] and you are prompted to confirm the FAX number is correct. Re-enter the same FAX number and press [OK] to complete the entry. For details, refer to Entry Check for New Destination in the machine's Operation Guide. To continue entering a new number, press [FAX No. Entry] and repeat the above procedure. To correct the FAX number, press [Edit]. Up to 64 digits can be entered as the fax number of the receiving system. Press [Space] to enter a space. Use [ ] or [ ] to move the cursor. To correct the fax number, press [Backspace] on the touch panel, and delete the digits one by one before 3-6
-
 1
1 -
2
-
3
-
4
-
5
-
6
-
7
-
8
-
9
-
10
-
11
-
12
-
13
-
14
-
15
-
16
-
17
-
18
-
19
-
20
-
21
-
22
-
23
-
24
-
25
-
26
-
27
-
28
-
29
-
30
-
31
-
32
-
33
-
34
-
35
-
36
-
37
-
38
-
39
-
40
-
 41
41 -
 42
42 -
 43
43 -
 44
44 -
 45
45 -
 46
46 -
 47
47 -
 48
48 -
 49
49 -
 50
50 -
 51
51 -
52
-
53
-
54
-
55
-
56
-
57
-
58
-
59
-
60
-
61
-
62
-
63
-
64
-
65
-
66
-
67
-
68
-
69
-
70
-
71
-
72
-
73
-
74
-
75
-
76
-
77
-
78
-
79
-
80
-
81
-
82
-
83
-
84
-
85
-
86
-
87
-
88
-
89
-
90
-
91
-
92
-
93
-
94
-
95
-
96
-
97
-
98
-
99
-
100
-
101
-
102
-
103
-
104
-
105
-
106
-
107
-
108
-
109
-
110
-
111
-
112
-
113
-
114
-
115
-
116
-
117
-
118
-
119
-
120
-
121
-
122
-
123
-
124
-
125
-
126
-
127
-
128
-
129
-
130
-
131
-
132
-
133
-
134
-
135
-
136
-
137
-
138
-
139
-
140
-
141
-
142
-
143
-
144
-
145
-
146
-
147
-
148
-
149
-
150
-
151
-
152
-
153
-
154
-
155
-
156
-
157
-
158
-
159
-
160
-
161
-
162
-
163
-
164
-
165
-
166
-
167
-
168
-
169
-
170
-
171
-
172
-
173
-
174
-
175
-
176
-
177
-
178
-
179
-
180
-
181
-
182
-
183
-
184
-
185
-
186
-
187
-
188
-
189
-
190
-
191
-
192
-
193
-
194
-
195
-
196
-
197
-
198
-
199
-
200
-
201
-
202
-
203
-
204
-
205
-
206
-
207
-
208
-
209
-
210
-
211
-
212
-
213
-
214
-
215
-
216
-
217
-
218
-
219
-
220
-
221
-
222
-
223
-
224
-
225
-
226
-
227
-
228
-
229
-
230
-
231
-
232
-
233
-
234
-
235
-
236
-
237
-
238
-
239
-
240
-
241
-
242
-
243
-
244
-
245
-
246
-
247
-
248
-
249
-
250
-
251
-
252
 |
 |