Lexmark C540 Service Manual - Page 106
Base Sensor Test, Miscellaneous tests, Motor Detect
 |
View all Lexmark C540 manuals
Add to My Manuals
Save this manual to your list of manuals |
Page 106 highlights
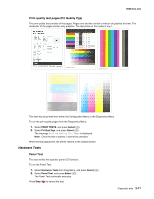
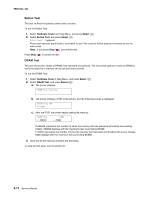
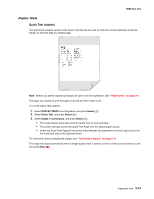
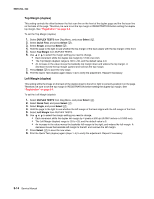
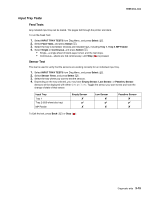
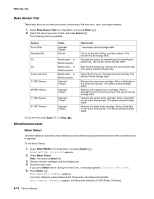
5025-2xx, 4xx Base Sensor Test These tests allow you to verify the correct functioning of the front door, input, and output sensors. 1. Select Base Sensor Test from Diag Menu, and press Select ( ). 2. Select the sensor you want to test, and press Select ( ). The following tests are available: Sensor Front Door Standard Bin S1 S2 Fuser exit sensr C-TMC Sensor M-TMC Sensor Y-TMC Sensor K-TMC Sensor Value Opened/ Closed Bin full Media clear... or Media present... Media clear... or Media present... Media clear... or Media present... Opened/ Closed Opened/ Closed Opened/ Closed Opened/ Closed How to test The sensor should change state. Lift up on the bin full flag, and then release. The sensor should change state. Activate the sensor by removing and re-inserting the paper tray. The sensor should change state. Remove the media tray. Activate the input sensor flag. The sensor should change state. Open the front cover. Activate the fuser exit flag. The sensor should change state. Remove the cyan toner cartridge. Shine a flashlight on the toner level sensor. The sensor should change state. Remove the magenta toner cartridge. Shine a flashlight on the toner level sensor. The sensor should change state. Remove the yellow toner cartridge. Shine a flashlight on the toner level sensor. The sensor should change state. Remove the black toner cartridge. Shine a flashlight on the toner level sensor. The sensor should change state. To exit the test, press Back ( ) or Stop ( ). Miscellaneous tests Motor Detect This test initiates an automatic motor detection process that should be performed whenever the controller board is replaced. To run Motor Detect: 1. Select MISC TESTS in the Diag Menu, and press Select ( ). Remove Cartridge. Press Select appears. 2. Select Motor Detect. Note: Do not press Select yet. 3. Remove all toner cartridges and the imaging unit. 4. Close the front cover. If you press Select before closing the front cover, a message appears: Close Cover. Press Select. 5. Press Select ( ). Motor Detection In Progress... appears. The motor detection process takes about 10 seconds, and stops automatically. Detect Complete. Rebooting... appears, and the printer performs a POR (Power On Reset). 3-16 Service Manual
-
 1
1 -
2
-
3
-
4
-
5
-
6
-
7
-
8
-
9
-
10
-
11
-
12
-
13
-
14
-
15
-
16
-
17
-
18
-
19
-
20
-
21
-
22
-
23
-
24
-
25
-
26
-
27
-
28
-
29
-
30
-
31
-
32
-
33
-
34
-
35
-
36
-
37
-
38
-
39
-
40
-
41
-
42
-
43
-
44
-
45
-
46
-
47
-
48
-
49
-
50
-
51
-
52
-
53
-
54
-
55
-
56
-
57
-
58
-
59
-
60
-
61
-
62
-
63
-
64
-
65
-
66
-
67
-
68
-
69
-
70
-
71
-
72
-
73
-
74
-
75
-
76
-
77
-
78
-
79
-
80
-
81
-
82
-
83
-
84
-
85
-
86
-
87
-
88
-
89
-
90
-
91
-
92
-
93
-
94
-
95
-
96
-
97
-
98
-
99
-
100
-
 101
101 -
 102
102 -
 103
103 -
 104
104 -
 105
105 -
 106
106 -
 107
107 -
 108
108 -
 109
109 -
 110
110 -
 111
111 -
112
-
113
-
114
-
115
-
116
-
117
-
118
-
119
-
120
-
121
-
122
-
123
-
124
-
125
-
126
-
127
-
128
-
129
-
130
-
131
-
132
-
133
-
134
-
135
-
136
-
137
-
138
-
139
-
140
-
141
-
142
-
143
-
144
-
145
-
146
-
147
-
148
-
149
-
150
-
151
-
152
-
153
-
154
-
155
-
156
-
157
-
158
-
159
-
160
-
161
-
162
-
163
-
164
-
165
-
166
-
167
-
168
-
169
-
170
-
171
-
172
-
173
-
174
-
175
-
176
-
177
-
178
-
179
-
180
-
181
-
182
-
183
-
184
-
185
-
186
-
187
-
188
-
189
-
190
-
191
-
192
-
193
-
194
-
195
-
196
-
197
-
198
-
199
-
200
-
201
-
202
-
203
-
204
-
205
-
206
-
207
-
208
-
209
-
210
-
211
-
212
-
213
-
214
-
215
-
216
-
217
-
218
-
219
-
220
-
221
-
222
-
223
-
224
-
225
-
226
-
227
-
228
-
229
-
230
-
231
-
232
-
233
-
234
-
235
-
236
 |
 |