Lexmark C540 Service Manual - Page 183
Main drive gear assembly removal, Remove the LVPS. See
 |
View all Lexmark C540 manuals
Add to My Manuals
Save this manual to your list of manuals |
Page 183 highlights
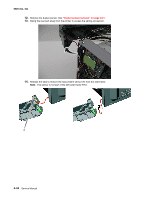
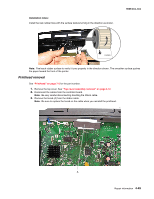
15. Remove the spring (G) from the left lower frame FRU. 5025-2xx, 4xx 16. Swing the rear of the lower frame away from the printer, and remove. Main drive gear assembly removal See "Main drive gear assembly, with motors" on page 7-5 for the part number. 1. Remove the left cover. See "Left cover assembly removal" on page 4-6. 2. Remove the LVPS. See "Low-voltage power supply (LVPS) assembly removal" on page 4-37. 3. Remove the screw (A) on the top cover. Repair information 4-45
-
 1
1 -
2
-
3
-
4
-
5
-
6
-
7
-
8
-
9
-
10
-
11
-
12
-
13
-
14
-
15
-
16
-
17
-
18
-
19
-
20
-
21
-
22
-
23
-
24
-
25
-
26
-
27
-
28
-
29
-
30
-
31
-
32
-
33
-
34
-
35
-
36
-
37
-
38
-
39
-
40
-
41
-
42
-
43
-
44
-
45
-
46
-
47
-
48
-
49
-
50
-
51
-
52
-
53
-
54
-
55
-
56
-
57
-
58
-
59
-
60
-
61
-
62
-
63
-
64
-
65
-
66
-
67
-
68
-
69
-
70
-
71
-
72
-
73
-
74
-
75
-
76
-
77
-
78
-
79
-
80
-
81
-
82
-
83
-
84
-
85
-
86
-
87
-
88
-
89
-
90
-
91
-
92
-
93
-
94
-
95
-
96
-
97
-
98
-
99
-
100
-
101
-
102
-
103
-
104
-
105
-
106
-
107
-
108
-
109
-
110
-
111
-
112
-
113
-
114
-
115
-
116
-
117
-
118
-
119
-
120
-
121
-
122
-
123
-
124
-
125
-
126
-
127
-
128
-
129
-
130
-
131
-
132
-
133
-
134
-
135
-
136
-
137
-
138
-
139
-
140
-
141
-
142
-
143
-
144
-
145
-
146
-
147
-
148
-
149
-
150
-
151
-
152
-
153
-
154
-
155
-
156
-
157
-
158
-
159
-
160
-
161
-
162
-
163
-
164
-
165
-
166
-
167
-
168
-
169
-
170
-
171
-
172
-
173
-
174
-
175
-
176
-
177
-
 178
178 -
 179
179 -
 180
180 -
 181
181 -
 182
182 -
 183
183 -
 184
184 -
 185
185 -
 186
186 -
 187
187 -
 188
188 -
189
-
190
-
191
-
192
-
193
-
194
-
195
-
196
-
197
-
198
-
199
-
200
-
201
-
202
-
203
-
204
-
205
-
206
-
207
-
208
-
209
-
210
-
211
-
212
-
213
-
214
-
215
-
216
-
217
-
218
-
219
-
220
-
221
-
222
-
223
-
224
-
225
-
226
-
227
-
228
-
229
-
230
-
231
-
232
-
233
-
234
-
235
-
236
 |
 |

Repair information
4-45
5025-2xx, 4xx
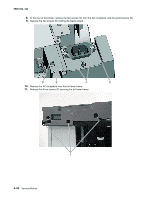
15.
Remove the spring (G) from the left lower frame FRU.
16.
Swing the rear of the lower frame away from the printer, and remove.
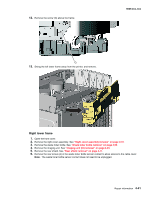
Main drive gear assembly removal
See
“Main drive gear assembly, with motors” on page 7-5
for the part number.
1.
Remove the left cover. See
“Left cover assembly removal” on page 4-6
.
2.
Remove the LVPS. See
“Low-voltage power supply (LVPS) assembly removal” on page 4-37
.
3.
Remove the screw (A) on the top cover.