Lexmark C540 Service Manual - Page 194
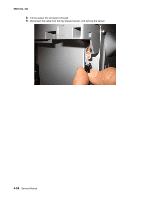
Push in on the cover above the locating pins C while lifting to disengage the cover. Carefully lift
 |
View all Lexmark C540 manuals
Add to My Manuals
Save this manual to your list of manuals |
Page 194 highlights
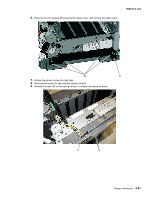
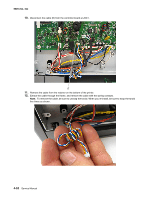
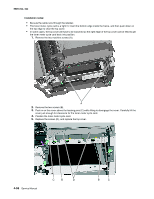
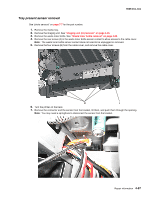
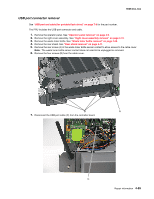
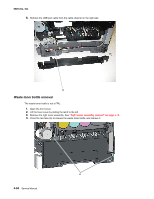
5025-2xx, 4xx Installation notes: • Be sure the cable runs through the retainer. • The toner meter cycle card is a tight fit. Insert the bottom edge inside the frame, and then push down on the top edge to clear the top cover. • In some cases, the top cover will have to be loosened so the right edge of the top cover can be lifted to get the toner meter cycle card back into position. 1. Remove the two machine screws (A). 2. Remove the two screws (B). 3. Push in on the cover above the locating pins (C) while lifting to disengage the cover. Carefully lift the cover just enough for clearance for the toner meter cycle card. 4. Position the toner meter cycle card. 5. Replace the screws (D), and replace the top cover. 4-56 Service Manual
-
 1
1 -
2
-
3
-
4
-
5
-
6
-
7
-
8
-
9
-
10
-
11
-
12
-
13
-
14
-
15
-
16
-
17
-
18
-
19
-
20
-
21
-
22
-
23
-
24
-
25
-
26
-
27
-
28
-
29
-
30
-
31
-
32
-
33
-
34
-
35
-
36
-
37
-
38
-
39
-
40
-
41
-
42
-
43
-
44
-
45
-
46
-
47
-
48
-
49
-
50
-
51
-
52
-
53
-
54
-
55
-
56
-
57
-
58
-
59
-
60
-
61
-
62
-
63
-
64
-
65
-
66
-
67
-
68
-
69
-
70
-
71
-
72
-
73
-
74
-
75
-
76
-
77
-
78
-
79
-
80
-
81
-
82
-
83
-
84
-
85
-
86
-
87
-
88
-
89
-
90
-
91
-
92
-
93
-
94
-
95
-
96
-
97
-
98
-
99
-
100
-
101
-
102
-
103
-
104
-
105
-
106
-
107
-
108
-
109
-
110
-
111
-
112
-
113
-
114
-
115
-
116
-
117
-
118
-
119
-
120
-
121
-
122
-
123
-
124
-
125
-
126
-
127
-
128
-
129
-
130
-
131
-
132
-
133
-
134
-
135
-
136
-
137
-
138
-
139
-
140
-
141
-
142
-
143
-
144
-
145
-
146
-
147
-
148
-
149
-
150
-
151
-
152
-
153
-
154
-
155
-
156
-
157
-
158
-
159
-
160
-
161
-
162
-
163
-
164
-
165
-
166
-
167
-
168
-
169
-
170
-
171
-
172
-
173
-
174
-
175
-
176
-
177
-
178
-
179
-
180
-
181
-
182
-
183
-
184
-
185
-
186
-
187
-
188
-
 189
189 -
 190
190 -
 191
191 -
 192
192 -
 193
193 -
 194
194 -
 195
195 -
 196
196 -
 197
197 -
 198
198 -
 199
199 -
200
-
201
-
202
-
203
-
204
-
205
-
206
-
207
-
208
-
209
-
210
-
211
-
212
-
213
-
214
-
215
-
216
-
217
-
218
-
219
-
220
-
221
-
222
-
223
-
224
-
225
-
226
-
227
-
228
-
229
-
230
-
231
-
232
-
233
-
234
-
235
-
236
 |
 |

4-56
Service Manual
5025-2xx, 4xx
Installation notes:
•
Be sure the cable runs through the retainer.
•
The toner meter cycle card is a tight fit. Insert the bottom edge inside the frame, and then push down on
the top edge to clear the top cover.
•
In some cases, the top cover will have to be loosened so the right edge of the top cover can be lifted to get
the toner meter cycle card back into position.
1.
Remove the two machine screws (A).
2.
Remove the two screws (B).
3.
Push in on the cover above the locating pins (C) while lifting to disengage the cover. Carefully lift the
cover just enough for clearance for the toner meter cycle card.
4.
Position the toner meter cycle card.
5.
Replace the screws (D), and replace the top cover.