Lexmark C540 Service Manual - Page 124
Step 1: Charge, 2xx, 4xx, Service tips, Reports, Print Defects
 |
View all Lexmark C540 manuals
Add to My Manuals
Save this manual to your list of manuals |
Page 124 highlights
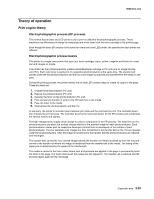
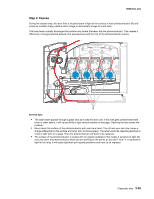
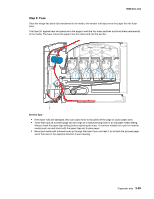
5025-2xx, 4xx Step 1: Charge During the charge step, voltage is sent from the high-voltage power supply to the charge roll inside each of the four photoconductors. The charge roll is part of the photoconductor unit. The charge rolls (A) put a uniform negative charge over the entire surface of the photoconductor to prepare it for the laser beam. Service tips: • If the surface of the charge roll is damaged (such as a nick or pit), it will cause the charge to be uneven on the photoconductor. This will cause a repeating mark on the printed page. Check the repeating marks table that prints from the operator panel. (Press Menu ( ), select Reports, and select Print Defects.) • If the charge roll is severely damaged, the surface of the photoconductor will not be charged properly and heavy amounts of toner will be deposited on the photoconductor. This causes the printed page to be saturated with 100% of each color. The imaging unit will need to be replaced sooner. 3-34 Service Manual
-
 1
1 -
2
-
3
-
4
-
5
-
6
-
7
-
8
-
9
-
10
-
11
-
12
-
13
-
14
-
15
-
16
-
17
-
18
-
19
-
20
-
21
-
22
-
23
-
24
-
25
-
26
-
27
-
28
-
29
-
30
-
31
-
32
-
33
-
34
-
35
-
36
-
37
-
38
-
39
-
40
-
41
-
42
-
43
-
44
-
45
-
46
-
47
-
48
-
49
-
50
-
51
-
52
-
53
-
54
-
55
-
56
-
57
-
58
-
59
-
60
-
61
-
62
-
63
-
64
-
65
-
66
-
67
-
68
-
69
-
70
-
71
-
72
-
73
-
74
-
75
-
76
-
77
-
78
-
79
-
80
-
81
-
82
-
83
-
84
-
85
-
86
-
87
-
88
-
89
-
90
-
91
-
92
-
93
-
94
-
95
-
96
-
97
-
98
-
99
-
100
-
101
-
102
-
103
-
104
-
105
-
106
-
107
-
108
-
109
-
110
-
111
-
112
-
113
-
114
-
115
-
116
-
117
-
118
-
 119
119 -
 120
120 -
 121
121 -
 122
122 -
 123
123 -
 124
124 -
 125
125 -
 126
126 -
 127
127 -
 128
128 -
 129
129 -
130
-
131
-
132
-
133
-
134
-
135
-
136
-
137
-
138
-
139
-
140
-
141
-
142
-
143
-
144
-
145
-
146
-
147
-
148
-
149
-
150
-
151
-
152
-
153
-
154
-
155
-
156
-
157
-
158
-
159
-
160
-
161
-
162
-
163
-
164
-
165
-
166
-
167
-
168
-
169
-
170
-
171
-
172
-
173
-
174
-
175
-
176
-
177
-
178
-
179
-
180
-
181
-
182
-
183
-
184
-
185
-
186
-
187
-
188
-
189
-
190
-
191
-
192
-
193
-
194
-
195
-
196
-
197
-
198
-
199
-
200
-
201
-
202
-
203
-
204
-
205
-
206
-
207
-
208
-
209
-
210
-
211
-
212
-
213
-
214
-
215
-
216
-
217
-
218
-
219
-
220
-
221
-
222
-
223
-
224
-
225
-
226
-
227
-
228
-
229
-
230
-
231
-
232
-
233
-
234
-
235
-
236
 |
 |
