Lexmark C540 Service Manual - Page 41
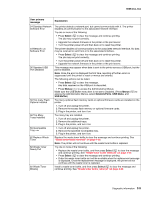
xx, 4xx, Select, User primary, message, Explanation, Memory to Collate Job - photoconductor kit
 |
View all Lexmark C540 manuals
Add to My Manuals
Save this manual to your list of manuals |
Page 41 highlights
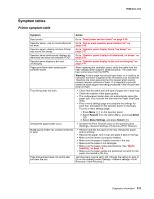
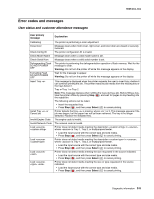
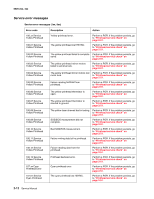
5025-2xx, 4xx User primary message Explanation Unsupported USB Device, Please Remove Remove the unrecognized device from the USB port on the front of the printer. Unsupported USB Remove the unrecognized USB hub from the USB port on the front of the printer. HUB, Please Remove 30.xx Cartridge Missing The specified toner cartridge is missing. Re-install the missing toner cartridge to clear the message, and then continue printing. If the message recurs remove and re-install the cartridge. Listen for the click to ensure the cartridge is installed properly. Close the front cover. 31.xx Defective Cartridge The specified cartridge is defective. Try one of the following: • Open and close the top cover. • Remove and re-install the cartridge(s). Listen for the click to ensure the cartridge is installed properly. • Turn the printer power off and turn the printer power on. If the message persists, replace the cartridge with a new one, and close the front cover. 31.xx Defective Imaging Kit Defective imaging kit. Try one or more of the following: • Open and close the top cover. • Remove and re-install the cartridge(s). Listen for the click to ensure the cartridge is installed properly. • Turn the printer power off, and then turn the printer power on. If the message persists, determine if the imaging kit counter indicates it is time for replacement. Print the Menu Setting page, and look on the last page. It will indicate OK, Replace Black, or Replace Black and Color. If the indicator says Replace Black or Replace Black and Color, then replace the appropriate kit. See "Imaging unit (IU) removal" on page 4-35. If the indicator says OK, replace only the photoconductor unit. Keep the developers from the original unit and reinstall them in the new photoconductor unit. 32.xx Unsupported Cartridge Remove the specified cartridge, replace with a supported cartridge, and close the front cover. 34 Short Paper • Make sure the print job is requesting the correct size of paper. • Check tray length and width guides to ensure paper is properly fitted in the tray. • Adjust the Paper Size setting for the size paper you are using. If MP Feeder Size is set to Universal, make sure the paper is large enough for the formatted data. • Press Select ( ) to clear the message and continue printing. The printer does not automatically reprint the page that prompted the message. • Press Stop ( ), and then press Select ( ) to cancel printing. 37 Insufficient This message is displayed when the printer memory used to store pages is too full to Memory to Collate Job collate the print job. Try one of the following: • Press Select ( ) to clear the message and continue printing. • Press Stop ( ), and then press Select ( ) to cancel printing. 37 Insufficient Memory for Flash Memory Defragment Operation This message is displayed when insufficient printer memory is available to perform Flash Memory Defragment operation. This message appears prior to the actual start of the defragment operation. Press Select ( ) to stop the defragment operation. To perform the defragment operation, you can: • Delete fonts, macros, and other data in RAM. • Install additional printer memory. • Press Stop ( ), and then press Select ( ) to cancel printing. Diagnostic information 2-7
-
 1
1 -
2
-
3
-
4
-
5
-
6
-
7
-
8
-
9
-
10
-
11
-
12
-
13
-
14
-
15
-
16
-
17
-
18
-
19
-
20
-
21
-
22
-
23
-
24
-
25
-
26
-
27
-
28
-
29
-
30
-
31
-
32
-
33
-
34
-
35
-
 36
36 -
 37
37 -
 38
38 -
 39
39 -
 40
40 -
 41
41 -
 42
42 -
 43
43 -
 44
44 -
 45
45 -
 46
46 -
47
-
48
-
49
-
50
-
51
-
52
-
53
-
54
-
55
-
56
-
57
-
58
-
59
-
60
-
61
-
62
-
63
-
64
-
65
-
66
-
67
-
68
-
69
-
70
-
71
-
72
-
73
-
74
-
75
-
76
-
77
-
78
-
79
-
80
-
81
-
82
-
83
-
84
-
85
-
86
-
87
-
88
-
89
-
90
-
91
-
92
-
93
-
94
-
95
-
96
-
97
-
98
-
99
-
100
-
101
-
102
-
103
-
104
-
105
-
106
-
107
-
108
-
109
-
110
-
111
-
112
-
113
-
114
-
115
-
116
-
117
-
118
-
119
-
120
-
121
-
122
-
123
-
124
-
125
-
126
-
127
-
128
-
129
-
130
-
131
-
132
-
133
-
134
-
135
-
136
-
137
-
138
-
139
-
140
-
141
-
142
-
143
-
144
-
145
-
146
-
147
-
148
-
149
-
150
-
151
-
152
-
153
-
154
-
155
-
156
-
157
-
158
-
159
-
160
-
161
-
162
-
163
-
164
-
165
-
166
-
167
-
168
-
169
-
170
-
171
-
172
-
173
-
174
-
175
-
176
-
177
-
178
-
179
-
180
-
181
-
182
-
183
-
184
-
185
-
186
-
187
-
188
-
189
-
190
-
191
-
192
-
193
-
194
-
195
-
196
-
197
-
198
-
199
-
200
-
201
-
202
-
203
-
204
-
205
-
206
-
207
-
208
-
209
-
210
-
211
-
212
-
213
-
214
-
215
-
216
-
217
-
218
-
219
-
220
-
221
-
222
-
223
-
224
-
225
-
226
-
227
-
228
-
229
-
230
-
231
-
232
-
233
-
234
-
235
-
236
 |
 |