Lexmark C540 Service Manual - Page 177
Lower frame removal, right and left, Left lower frame
 |
View all Lexmark C540 manuals
Add to My Manuals
Save this manual to your list of manuals |
Page 177 highlights
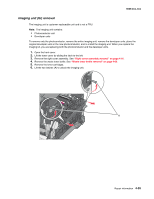
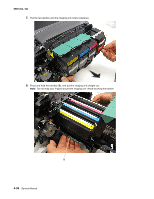
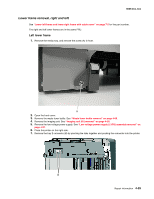
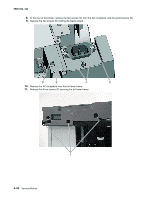
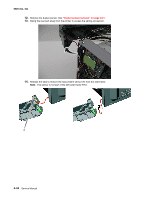
5025-2xx, 4xx Lower frame removal, right and left See "Lower left frame and lower right frame with cable cover" on page 7-5 for the part number. The right and left lower frames are in the same FRU. Left lower frame 1. Remove the media tray, and remove the screw (A) in front. 2. Open the front cover. 3. Remove the waste toner bottle. See "Waste toner bottle removal" on page 4-60. 4. Remove the imaging unit. See "Imaging unit (IU) removal" on page 4-35. 5. Remove the low-voltage power supply. See "Low-voltage power supply (LVPS) assembly removal" on page 4-37. 6. Place the printer on the right side. 7. Remove the tray 2 connector (B) by pinching the tabs together and pushing the connector into the printer. Repair information 4-39
-
 1
1 -
2
-
3
-
4
-
5
-
6
-
7
-
8
-
9
-
10
-
11
-
12
-
13
-
14
-
15
-
16
-
17
-
18
-
19
-
20
-
21
-
22
-
23
-
24
-
25
-
26
-
27
-
28
-
29
-
30
-
31
-
32
-
33
-
34
-
35
-
36
-
37
-
38
-
39
-
40
-
41
-
42
-
43
-
44
-
45
-
46
-
47
-
48
-
49
-
50
-
51
-
52
-
53
-
54
-
55
-
56
-
57
-
58
-
59
-
60
-
61
-
62
-
63
-
64
-
65
-
66
-
67
-
68
-
69
-
70
-
71
-
72
-
73
-
74
-
75
-
76
-
77
-
78
-
79
-
80
-
81
-
82
-
83
-
84
-
85
-
86
-
87
-
88
-
89
-
90
-
91
-
92
-
93
-
94
-
95
-
96
-
97
-
98
-
99
-
100
-
101
-
102
-
103
-
104
-
105
-
106
-
107
-
108
-
109
-
110
-
111
-
112
-
113
-
114
-
115
-
116
-
117
-
118
-
119
-
120
-
121
-
122
-
123
-
124
-
125
-
126
-
127
-
128
-
129
-
130
-
131
-
132
-
133
-
134
-
135
-
136
-
137
-
138
-
139
-
140
-
141
-
142
-
143
-
144
-
145
-
146
-
147
-
148
-
149
-
150
-
151
-
152
-
153
-
154
-
155
-
156
-
157
-
158
-
159
-
160
-
161
-
162
-
163
-
164
-
165
-
166
-
167
-
168
-
169
-
170
-
171
-
 172
172 -
 173
173 -
 174
174 -
 175
175 -
 176
176 -
 177
177 -
 178
178 -
 179
179 -
 180
180 -
 181
181 -
 182
182 -
183
-
184
-
185
-
186
-
187
-
188
-
189
-
190
-
191
-
192
-
193
-
194
-
195
-
196
-
197
-
198
-
199
-
200
-
201
-
202
-
203
-
204
-
205
-
206
-
207
-
208
-
209
-
210
-
211
-
212
-
213
-
214
-
215
-
216
-
217
-
218
-
219
-
220
-
221
-
222
-
223
-
224
-
225
-
226
-
227
-
228
-
229
-
230
-
231
-
232
-
233
-
234
-
235
-
236
 |
 |

Repair information
4-39
5025-2xx, 4xx
Lower frame removal, right and left
See
“Lower left frame and lower right frame with cable cover” on page 7-5
for the part number.
The right and left lower frames are in the same FRU.
Left lower frame
1.
Remove the media tray, and remove the screw (A) in front.
2.
Open the front cover.
3.
Remove the waste toner bottle. See
“Waste toner bottle removal” on page 4-60
.
4.
Remove the imaging unit. See
“Imaging unit (IU) removal” on page 4-35
.
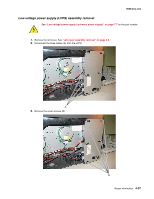
5.
Remove the low-voltage power supply. See
“Low-voltage power supply (LVPS) assembly removal” on
page 4-37
.
6.
Place the printer on the right side.
7.
Remove the tray 2 connector (B) by pinching the tabs together and pushing the connector into the printer.