Lexmark X5495 User's Guide - Page 119
Networking the printer, Networking overview, Assigning an IP address, Selecting a network printer - printer network
 |
UPC - 734646058568
View all Lexmark X5495 manuals
Add to My Manuals
Save this manual to your list of manuals |
Page 119 highlights
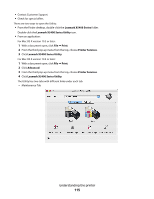
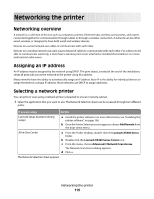
Networking the printer Networking overview A network is a collection of devices such as computers, printers, Ethernet hubs, wireless access points, and routers connected together for communication through cables or through a wireless connection. A network can be either wired, wireless, or designed to have both wired and wireless devices. Devices on a wired network use cables to communicate with each other. Devices on a wireless network use radio waves instead of cables to communicate with each other. For a device to be able to communicate wirelessly, it must have a wireless print server attached or installed that enables it to receive and transmit radio waves. Assigning an IP address An IP address may be assigned by the network using DHCP. The print object, created at the end of the installation, sends all print jobs across the network to the printer using this address. Many networks have the ability to automatically assign an IP address. Auto-IP is the ability for individual devices to assign themselves a unique IP address. Most networks use DHCP to assign addresses. Selecting a network printer You can print or scan using a network printer connected to a local or remote subnet. 1 Open the application that you want to use. The Network Selection sheet can be accessed through two different paths: If you are using Do this Lexmark Setup Assistant (during setup) a Install the printer software. For more information, see "Installing the printer software" on page 106. b Once the Printer Selection screen appears, choose Add Remote from the drop-down menu. All-in-One Center a From the Finder desktop, double-click the Lexmark X5400 Series folder. b Double-click the Lexmark X5400 Series Center icon. c From the menu, choose AdvancedΠNetwork Scan Access. The Network Scan Access dialog appears. d Click +. The Network Selection sheet appears. Networking the printer 119
-
 1
1 -
2
-
3
-
4
-
5
-
6
-
7
-
8
-
9
-
10
-
11
-
12
-
13
-
14
-
15
-
16
-
17
-
18
-
19
-
20
-
21
-
22
-
23
-
24
-
25
-
26
-
27
-
28
-
29
-
30
-
31
-
32
-
33
-
34
-
35
-
36
-
37
-
38
-
39
-
40
-
41
-
42
-
43
-
44
-
45
-
46
-
47
-
48
-
49
-
50
-
51
-
52
-
53
-
54
-
55
-
56
-
57
-
58
-
59
-
60
-
61
-
62
-
63
-
64
-
65
-
66
-
67
-
68
-
69
-
70
-
71
-
72
-
73
-
74
-
75
-
76
-
77
-
78
-
79
-
80
-
81
-
82
-
83
-
84
-
85
-
86
-
87
-
88
-
89
-
90
-
91
-
92
-
93
-
94
-
95
-
96
-
97
-
98
-
99
-
100
-
101
-
102
-
103
-
104
-
105
-
106
-
107
-
108
-
109
-
110
-
111
-
112
-
113
-
 114
114 -
 115
115 -
 116
116 -
 117
117 -
 118
118 -
 119
119 -
 120
120 -
 121
121 -
 122
122 -
 123
123 -
 124
124 -
125
-
126
-
127
-
128
-
129
-
130
-
131
-
132
-
133
-
134
-
135
-
136
-
137
-
138
-
139
-
140
-
141
-
142
-
143
-
144
-
145
-
146
-
147
-
148
-
149
-
150
-
151
-
152
-
153
-
154
-
155
-
156
-
157
-
158
-
159
-
160
-
161
-
162
-
163
-
164
-
165
-
166
-
167
-
168
-
169
-
170
-
171
-
172
-
173
-
174
-
175
-
176
-
177
-
178
-
179
-
180
-
181
-
182
-
183
-
184
-
185
-
186
-
187
-
188
-
189
-
190
-
191
 |
 |