Lexmark X5495 User's Guide - Page 83
Printing photos using color effects, Photo Number, Photo Effects
 |
UPC - 734646058568
View all Lexmark X5495 manuals
Add to My Manuals
Save this manual to your list of manuals |
Page 83 highlights
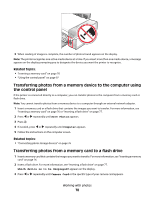
4 Press . 5 Press or repeatedly until Photo Number appears. 6 Press . 7 Use the keypad to enter the number of the photo you want to print. Use the proof sheet to identify the number of a photo. Note: If you want to erase or change the number of the photo you entered, press . This will work if you did not press after entering the number of the photo. 8 Press to select a photo. 9 If you want to select additional photos, use the keypad to enter the number of the photo you want to print, and then press . 10 Press Start Color or Start Black. 11 Press Start Color or Start Black again. Related topics: • "Printing photos stored on the memory device using the proof sheet" on page 81 • "Loading paper" on page 6 Printing photos using color effects You can use the control panel to apply color effects to your photos. Note: You can also print photos with color effects using a proof sheet. For more information, see "Printing photos stored on the memory device using the proof sheet" on page 81. 1 Load photo paper with the glossy or printable side facing you. (If you are not sure which side is the printable side, see the instructions that came with the paper.) For more information, see "Loading paper" on page 6. 2 Insert a memory card or flash drive that contains the images you want to print. For more information, see "Inserting a memory card" on page 76 or "Inserting a flash drive" on page 77. 3 Press or repeatedly until Photo Effects appears. 4 Press . 5 Press or repeatedly until the color effect you want appears. Note: Color effect selections include Sepia, Antique Grey, and Antique Brown. 6 Press . Note: The color effect applies to all the photos you print until the active memory card or flash drive is removed. Related topics: • "Using the control panel" on page 97 Working with photos 83
-
 1
1 -
2
-
3
-
4
-
5
-
6
-
7
-
8
-
9
-
10
-
11
-
12
-
13
-
14
-
15
-
16
-
17
-
18
-
19
-
20
-
21
-
22
-
23
-
24
-
25
-
26
-
27
-
28
-
29
-
30
-
31
-
32
-
33
-
34
-
35
-
36
-
37
-
38
-
39
-
40
-
41
-
42
-
43
-
44
-
45
-
46
-
47
-
48
-
49
-
50
-
51
-
52
-
53
-
54
-
55
-
56
-
57
-
58
-
59
-
60
-
61
-
62
-
63
-
64
-
65
-
66
-
67
-
68
-
69
-
70
-
71
-
72
-
73
-
74
-
75
-
76
-
77
-
 78
78 -
 79
79 -
 80
80 -
 81
81 -
 82
82 -
 83
83 -
 84
84 -
 85
85 -
 86
86 -
 87
87 -
 88
88 -
89
-
90
-
91
-
92
-
93
-
94
-
95
-
96
-
97
-
98
-
99
-
100
-
101
-
102
-
103
-
104
-
105
-
106
-
107
-
108
-
109
-
110
-
111
-
112
-
113
-
114
-
115
-
116
-
117
-
118
-
119
-
120
-
121
-
122
-
123
-
124
-
125
-
126
-
127
-
128
-
129
-
130
-
131
-
132
-
133
-
134
-
135
-
136
-
137
-
138
-
139
-
140
-
141
-
142
-
143
-
144
-
145
-
146
-
147
-
148
-
149
-
150
-
151
-
152
-
153
-
154
-
155
-
156
-
157
-
158
-
159
-
160
-
161
-
162
-
163
-
164
-
165
-
166
-
167
-
168
-
169
-
170
-
171
-
172
-
173
-
174
-
175
-
176
-
177
-
178
-
179
-
180
-
181
-
182
-
183
-
184
-
185
-
186
-
187
-
188
-
189
-
190
-
191
 |
 |