Lexmark X5495 User's Guide - Page 92
Enhancing photo print quality using the software, Enlarging or reducing an image
 |
UPC - 734646058568
View all Lexmark X5495 manuals
Add to My Manuals
Save this manual to your list of manuals |
Page 92 highlights
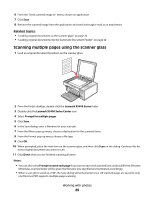
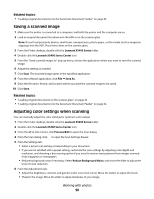
Related topics: • "Using the All-In-One Center" on page 112 Enhancing photo print quality using the software 1 From the Finder desktop, double-click the Lexmark X5400 Series folder. 2 Double-click the Lexmark X5400 Series Center icon. 3 From the "What is being scanned?" menu, choose Photo. 4 From the "How will the scanned image be used?" pop-up menu, choose To be printed or To be viewed on monitor/web page. Photo scanning is optimized based on this selection. 5 Click Preview/Edit to open the Scan dialog. 6 From the Scan dialog, click to open the Scan Settings drawer. 7 From the Settings tab, make sure you select one of the preset scan settings appropriate for your photo. You can also customize scan settings by adjusting color depth, resolution, and choosing a descreening option. 8 Select the Adjustments tab and fine-tune the scan settings. Related topics: • "Using the All-In-One Center" on page 112 • "Customizing scan settings from the Scan dialog" on page 44 Enlarging or reducing an image 1 Load paper. Note: If you are copying photos, use photo or heavyweight matte paper, with the glossy or printable side facing you. (If you are not sure which side is the printable side, see the instructions that came with the paper.) 2 Load an original document facedown into the ADF or on the scanner glass. Note: Do not load postcards, photos, small items, transparencies, photo paper, or thin media (such as magazine clippings) into the ADF. Place these items on the scanner glass. 3 From the control panel, press Copy Mode. 4 Press . 5 Press or repeatedly until Resize appears. 6 Press . 7 Press or repeatedly until the setting you want appears. Note: To select Custom Resize, press and use the keypad to enter a custom size. 8 Press Start Color or Start Black. Related topics: • "Loading original documents on the scanner glass" on page 23 • "Using the control panel" on page 97 Working with photos 92
-
 1
1 -
2
-
3
-
4
-
5
-
6
-
7
-
8
-
9
-
10
-
11
-
12
-
13
-
14
-
15
-
16
-
17
-
18
-
19
-
20
-
21
-
22
-
23
-
24
-
25
-
26
-
27
-
28
-
29
-
30
-
31
-
32
-
33
-
34
-
35
-
36
-
37
-
38
-
39
-
40
-
41
-
42
-
43
-
44
-
45
-
46
-
47
-
48
-
49
-
50
-
51
-
52
-
53
-
54
-
55
-
56
-
57
-
58
-
59
-
60
-
61
-
62
-
63
-
64
-
65
-
66
-
67
-
68
-
69
-
70
-
71
-
72
-
73
-
74
-
75
-
76
-
77
-
78
-
79
-
80
-
81
-
82
-
83
-
84
-
85
-
86
-
 87
87 -
 88
88 -
 89
89 -
 90
90 -
 91
91 -
 92
92 -
 93
93 -
 94
94 -
 95
95 -
 96
96 -
 97
97 -
98
-
99
-
100
-
101
-
102
-
103
-
104
-
105
-
106
-
107
-
108
-
109
-
110
-
111
-
112
-
113
-
114
-
115
-
116
-
117
-
118
-
119
-
120
-
121
-
122
-
123
-
124
-
125
-
126
-
127
-
128
-
129
-
130
-
131
-
132
-
133
-
134
-
135
-
136
-
137
-
138
-
139
-
140
-
141
-
142
-
143
-
144
-
145
-
146
-
147
-
148
-
149
-
150
-
151
-
152
-
153
-
154
-
155
-
156
-
157
-
158
-
159
-
160
-
161
-
162
-
163
-
164
-
165
-
166
-
167
-
168
-
169
-
170
-
171
-
172
-
173
-
174
-
175
-
176
-
177
-
178
-
179
-
180
-
181
-
182
-
183
-
184
-
185
-
186
-
187
-
188
-
189
-
190
-
191
 |
 |