Lexmark X5495 User's Guide - Page 170
Error messages on the printer display, Alignment Error, Cartridge Error (1102 - alignment problem
 |
UPC - 734646058568
View all Lexmark X5495 manuals
Add to My Manuals
Save this manual to your list of manuals |
Page 170 highlights
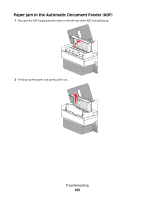
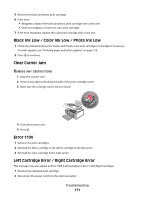
3 Firmly plug the rectangular end of the USB cable into the USB port of the computer. The USB port is marked with the USB symbol. Error messages on the printer display Alignment Error These are possible solutions. Try one or more of the following: REMOVE TAPE FROM PRINT CARTRIDGE 1 Remove the print cartridge. 2 Make sure the sticker and tape have been removed. 1 2 3 Reinsert the cartridge. 4 Press to align the cartridge. For more information, see "Aligning print cartridges" on page 124. USE NEW PAPER Load only plain, unmarked paper for aligning the cartridge. The printer will read any markings on used paper, which could cause the alignment error message to appear. Cartridge Error (1102, 1203, 1204, or 120F) 1 Remove the print cartridges, and close the cartridge carrier lids. 2 Disconnect the power cord from the electrical outlet. 3 Reconnect the power cord to the electrical outlet. 4 If the button is not lit, press . 5 Reinsert the print cartridges. If the error does not reappear, the problem has been corrected. If the problem reappears, one of the cartridges is not working properly. Continue with the following procedure to determine which cartridge is not working properly. 1 Remove the print cartridges, and close the cartridge carrier lids. 2 Disconnect the power cord from the electrical outlet. 3 Reconnect the power cord to the electrical outlet. 4 If the button is not lit, press . Troubleshooting 170
-
 1
1 -
2
-
3
-
4
-
5
-
6
-
7
-
8
-
9
-
10
-
11
-
12
-
13
-
14
-
15
-
16
-
17
-
18
-
19
-
20
-
21
-
22
-
23
-
24
-
25
-
26
-
27
-
28
-
29
-
30
-
31
-
32
-
33
-
34
-
35
-
36
-
37
-
38
-
39
-
40
-
41
-
42
-
43
-
44
-
45
-
46
-
47
-
48
-
49
-
50
-
51
-
52
-
53
-
54
-
55
-
56
-
57
-
58
-
59
-
60
-
61
-
62
-
63
-
64
-
65
-
66
-
67
-
68
-
69
-
70
-
71
-
72
-
73
-
74
-
75
-
76
-
77
-
78
-
79
-
80
-
81
-
82
-
83
-
84
-
85
-
86
-
87
-
88
-
89
-
90
-
91
-
92
-
93
-
94
-
95
-
96
-
97
-
98
-
99
-
100
-
101
-
102
-
103
-
104
-
105
-
106
-
107
-
108
-
109
-
110
-
111
-
112
-
113
-
114
-
115
-
116
-
117
-
118
-
119
-
120
-
121
-
122
-
123
-
124
-
125
-
126
-
127
-
128
-
129
-
130
-
131
-
132
-
133
-
134
-
135
-
136
-
137
-
138
-
139
-
140
-
141
-
142
-
143
-
144
-
145
-
146
-
147
-
148
-
149
-
150
-
151
-
152
-
153
-
154
-
155
-
156
-
157
-
158
-
159
-
160
-
161
-
162
-
163
-
164
-
 165
165 -
 166
166 -
 167
167 -
 168
168 -
 169
169 -
 170
170 -
 171
171 -
 172
172 -
 173
173 -
 174
174 -
 175
175 -
176
-
177
-
178
-
179
-
180
-
181
-
182
-
183
-
184
-
185
-
186
-
187
-
188
-
189
-
190
-
191
 |
 |