Pioneer PRO 111FD Owner's Manual - Page 19
Attach/Detach the Speaker, Stand-Mounted Panel - reviews
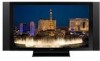 |
UPC - 012562887111
View all Pioneer PRO 111FD manuals
Add to My Manuals
Save this manual to your list of manuals |
Page 19 highlights
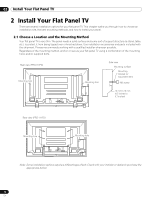
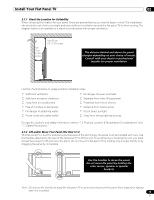
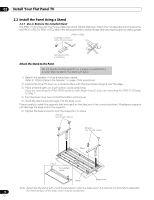
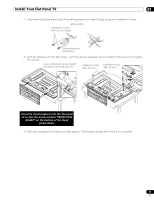
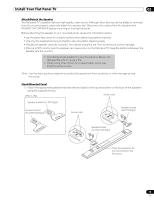
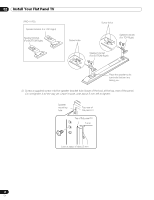
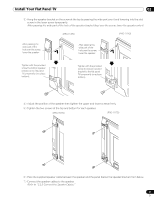
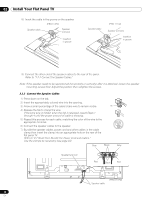
Install Your Flat Panel TV 02 Attach/Detach the Speaker The flat panel TV's speaker delivers high-quality, clear sound. Although other devices can be added or removed from the mounted panel, physically attach the speaker last. Disconnect the cables from the Speaker and REMOVE THE SPEAKER before mounting or moving the panel. Before attaching the speaker to your mounted panel, review the information below. • Lay the panel face down on a stable surface when attaching speaker brackets. • Use only the supplied screws and tighten securely before stepping away. • Handle the speaker carefully to protect the cabinet and grille net from scratches and other damage. • Placing a CRT monitor near the speaker can cause a blur on the flat panel TV. Keep the distance between the speaker and the monitor. • Connecting these speakers to another panel or device can damage the unit or cause a fire. • When using tone control to increase treble, avoid overamplifying the volume. Note: Use the foam packing materials to protect the equipment from scratches or other damage during mounting. Stand-Mounted Panel 1 ) Attach the appropriate speaker brackets (left and right) to the top and bottom on the back of the speakers using the supplied screws. (PRO-151FD) Screw holes Speaker bracket (For TOP-Right) Speaker bracket (For BOTTOM-Right) Screw holes Speaker bracket (For TOP-Right) Speaker bracket (For BOTTOM-Right) Place the speaker so its terminals (bottom) are facing you. 19 En
-
 1
1 -
2
-
3
-
4
-
5
-
6
-
7
-
8
-
9
-
10
-
11
-
12
-
13
-
 14
14 -
 15
15 -
 16
16 -
 17
17 -
 18
18 -
 19
19 -
 20
20 -
 21
21 -
 22
22 -
 23
23 -
 24
24 -
25
-
26
-
27
-
28
-
29
-
30
-
31
-
32
-
33
-
34
-
35
-
36
-
37
-
38
-
39
-
40
-
41
-
42
-
43
-
44
-
45
-
46
-
47
-
48
-
49
-
50
-
51
-
52
-
53
-
54
-
55
-
56
-
57
-
58
-
59
-
60
-
61
-
62
-
63
-
64
-
65
-
66
-
67
-
68
-
69
-
70
-
71
-
72
-
73
-
74
-
75
-
76
-
77
-
78
-
79
-
80
-
81
-
82
-
83
-
84
-
85
-
86
-
87
-
88
-
89
-
90
-
91
-
92
-
93
-
94
-
95
-
96
-
97
-
98
-
99
-
100
-
101
-
102
-
103
-
104
-
105
-
106
-
107
-
108
-
109
-
110
-
111
-
112
-
113
-
114
-
115
-
116
-
117
-
118
-
119
-
120
-
121
-
122
-
123
-
124
-
125
-
126
-
127
-
128
-
129
-
130
-
131
-
132
-
133
-
134
-
135
-
136
-
137
-
138
-
139
-
140
-
141
-
142
-
143
-
144
-
145
-
146
-
147
-
148
-
149
-
150
-
151
-
152
-
153
-
154
-
155
-
156
-
157
-
158
-
159
-
160
-
161
-
162
-
163
-
164
-
165
-
166
-
167
 |
 |
