Pioneer PRO 111FD Owner's Manual - Page 22
Refer to 2.7 Route then Bundle the Power Cord and Cables.
 |
UPC - 012562887111
View all Pioneer PRO 111FD manuals
Add to My Manuals
Save this manual to your list of manuals |
Page 22 highlights
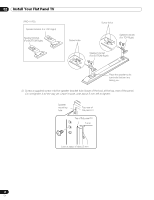
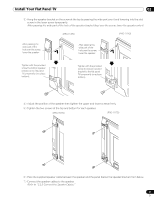
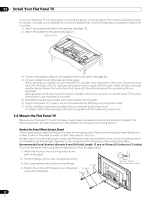
02 Install Your Flat Panel TV 8 ) Insert the cable in the groove on the speaker. (PRO-151FD) Speaker cable Speaker terminal Insertion in groove Speaker cable (PRO-111FD) Speaker terminal Insertion in groove 9 ) Connect the other end of the speaker cables to the rear of the panel. Refer to " 2.2.2 Connect the Speaker Cables." Note: If the speaker needs to be repositioned (horizontally or vertically) after it is attached, loosen the speaker mounting screws first. Adjust the position then retighten the screws. 2.2.2 Connect the Speaker Cables 1 ) Press down on the tab. 2 ) Insert the appropriately colored wire into the opening. 3 ) Allow a small percentage of the cable's bare wire to remain visible. tab 4 ) Release the tab to clamp the wire. If the bare wire is hidden when the tab is released, repeat Steps 1 through 4 until the proper amount of cable is showing. 5 ) Repeat this process for each cable, matching the color of the wire to the appropriate terminal. 6 ) Connect the speaker cables to the speaker. 7 ) Bundle the speaker cables, power cord and other cables in the cable clamp then insert the clamp into an appropriate hole on the rear of the flat panel TV. Refer to "2.7 Route then Bundle the Power Cord and Cables." Use the clamps as necessary (see page 33). Gray Black Gray Speaker terminal Red Black Red Speaker cable (PRO-151FD) 22 En
-
 1
1 -
2
-
3
-
4
-
5
-
6
-
7
-
8
-
9
-
10
-
11
-
12
-
13
-
14
-
15
-
16
-
 17
17 -
 18
18 -
 19
19 -
 20
20 -
 21
21 -
 22
22 -
 23
23 -
 24
24 -
 25
25 -
 26
26 -
 27
27 -
28
-
29
-
30
-
31
-
32
-
33
-
34
-
35
-
36
-
37
-
38
-
39
-
40
-
41
-
42
-
43
-
44
-
45
-
46
-
47
-
48
-
49
-
50
-
51
-
52
-
53
-
54
-
55
-
56
-
57
-
58
-
59
-
60
-
61
-
62
-
63
-
64
-
65
-
66
-
67
-
68
-
69
-
70
-
71
-
72
-
73
-
74
-
75
-
76
-
77
-
78
-
79
-
80
-
81
-
82
-
83
-
84
-
85
-
86
-
87
-
88
-
89
-
90
-
91
-
92
-
93
-
94
-
95
-
96
-
97
-
98
-
99
-
100
-
101
-
102
-
103
-
104
-
105
-
106
-
107
-
108
-
109
-
110
-
111
-
112
-
113
-
114
-
115
-
116
-
117
-
118
-
119
-
120
-
121
-
122
-
123
-
124
-
125
-
126
-
127
-
128
-
129
-
130
-
131
-
132
-
133
-
134
-
135
-
136
-
137
-
138
-
139
-
140
-
141
-
142
-
143
-
144
-
145
-
146
-
147
-
148
-
149
-
150
-
151
-
152
-
153
-
154
-
155
-
156
-
157
-
158
-
159
-
160
-
161
-
162
-
163
-
164
-
165
-
166
-
167
 |
 |