Pioneer PRO 111FD Owner's Manual - Page 27
when side-mounted speakers are installed
 |
UPC - 012562887111
View all Pioneer PRO 111FD manuals
Add to My Manuals
Save this manual to your list of manuals |
Page 27 highlights
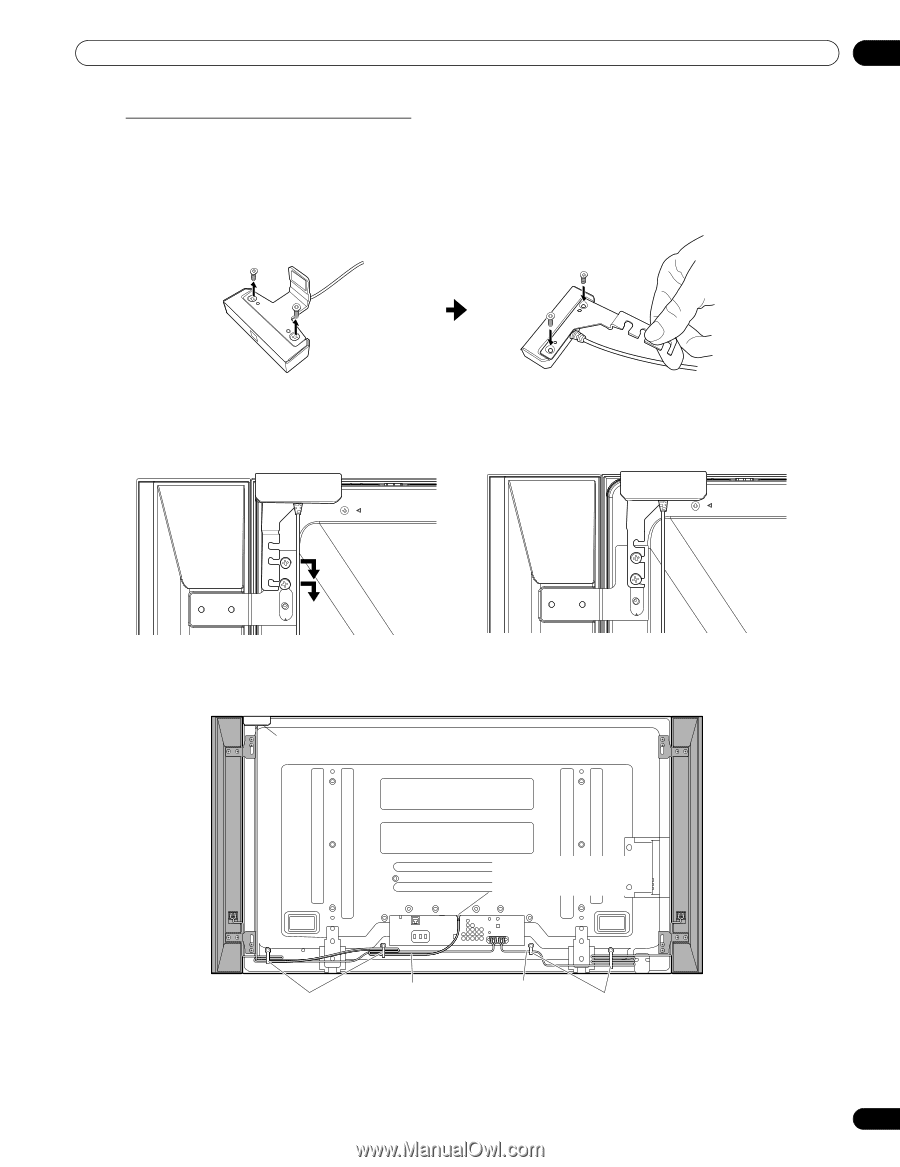
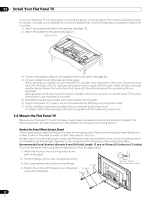
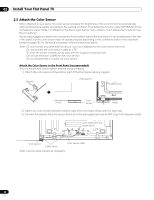
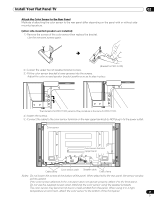
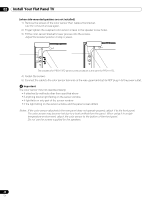
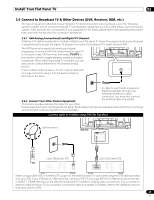
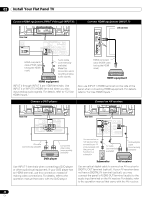
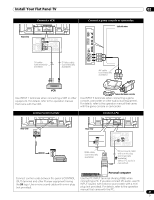
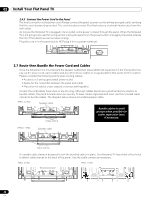
Install Your Flat Panel TV 02 Attach the Color Sensor to the Rear Panel Methods of attaching the color sensor to the rear panel differ depending on the panel with or without sidemounted speakers. (when side-mounted speakers are installed) 1 ) Remove the screws of the color sensor then replace the bracket. Use the removed screws again. (Bracket for PRO-151FD) 2 ) Loosen the upper two (2) speaker bracket screws. 3 ) Fit the color sensor bracket's lower grooves into the screws. Adjust the color sensor/speaker bracket positions so as to stay in place. The bracket is for PRO-151FD panel but the procedure is the same for PRO-111FD. 4 ) Fasten the screws. 5 ) Connect the cable to the color sensor terminal on the rear upper bank but do NOT plug in to the power outlet. Color sensor Color sensor terminal (upper bank) Color sensor cable Speaker cable Cable clamp Cable clamp Notes: Do not loosen the screws at the bottom of the panel. When attached to the rear panel, the sensor window points upward. If the color sensor attached to the rear panel does not operate properly, attach it to the front panel. Do not use the supplied screws when attaching the color sensor using the speaker brackets. The color sensor may become hot due to a heat emitted from the panel. When using it in a high- temperature environment, attach the color sensor to the bottom of the front panel. 27 En
-
 1
1 -
2
-
3
-
4
-
5
-
6
-
7
-
8
-
9
-
10
-
11
-
12
-
13
-
14
-
15
-
16
-
17
-
18
-
19
-
20
-
21
-
 22
22 -
 23
23 -
 24
24 -
 25
25 -
 26
26 -
 27
27 -
 28
28 -
 29
29 -
 30
30 -
 31
31 -
 32
32 -
33
-
34
-
35
-
36
-
37
-
38
-
39
-
40
-
41
-
42
-
43
-
44
-
45
-
46
-
47
-
48
-
49
-
50
-
51
-
52
-
53
-
54
-
55
-
56
-
57
-
58
-
59
-
60
-
61
-
62
-
63
-
64
-
65
-
66
-
67
-
68
-
69
-
70
-
71
-
72
-
73
-
74
-
75
-
76
-
77
-
78
-
79
-
80
-
81
-
82
-
83
-
84
-
85
-
86
-
87
-
88
-
89
-
90
-
91
-
92
-
93
-
94
-
95
-
96
-
97
-
98
-
99
-
100
-
101
-
102
-
103
-
104
-
105
-
106
-
107
-
108
-
109
-
110
-
111
-
112
-
113
-
114
-
115
-
116
-
117
-
118
-
119
-
120
-
121
-
122
-
123
-
124
-
125
-
126
-
127
-
128
-
129
-
130
-
131
-
132
-
133
-
134
-
135
-
136
-
137
-
138
-
139
-
140
-
141
-
142
-
143
-
144
-
145
-
146
-
147
-
148
-
149
-
150
-
151
-
152
-
153
-
154
-
155
-
156
-
157
-
158
-
159
-
160
-
161
-
162
-
163
-
164
-
165
-
166
-
167
 |
 |