Pioneer PRO 111FD Owner's Manual - Page 63
Parameter, Description
 |
UPC - 012562887111
View all Pioneer PRO 111FD manuals
Add to My Manuals
Save this manual to your list of manuals |
Page 63 highlights
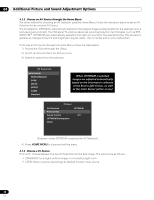
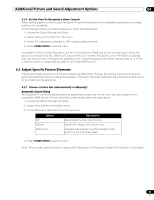
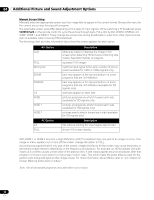
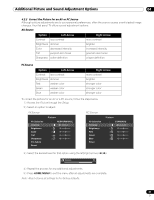
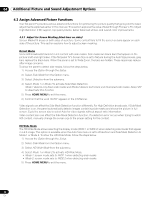
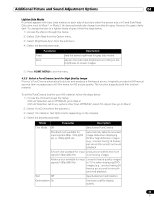
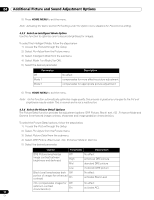
Additional Picture and Sound Adjustment Options 04 Lighten Side Masks If content appears with bars (side masks) on each side of a picture when the screen size is 4:3 and Side Mask Detection is set to Mode 1 or Mode 2, the bars automatically change from black to gray. However, the gray is fairly dark. To change the bars to a lighter shade of gray, follow the steps below. 1 ) Access the Option through the Setup. 2 ) Select Side Mask from the Option menu. 3 ) Select Brightness Sync. from the submenu. 4 ) Select the desired parameter. Parameter Fixed Auto Description sets the same brightness for gray side masks adjusts the side mask brightness according to the brightness of screen images 5 ) Press HOME MENU to exit the menu. 4.3.2 Select a PureCinema Level for High Quality Image Pioneer's PureCinema automatically detects and analyses a film-based source (originally encoded at 24 frames/ second) then recreates each still film frame for HD picture quality. The function supports both film and text material. To set the PureCinema level for your HD material, follow the steps below. 1 ) Access the Picture through the Setup. With AV Selection set to OPTIMUM, go to Step 2. With AV Selection set to any options other than OPTIMUM, select Pro Adjust then go to Step 2. 2 ) Select PureCinema from the submenu. 3 ) Select Film Mode or Text Optimization depending on the material. 4 ) Select the desired parameter. Mode Parameter Description Film Mode Off deactivates PureCinema Standard (not available for input signals 480p, 720p @60 Hz, or 1080p @60 Hz) automatically detects recorded image data when displaying DVD or high-definition images (e.g., movies) having 24 frames per second for smooth and vivid playback Smooth (not available for input produces smoother and more signals 1080p @60 Hz) vivid moving images Advance (not available for input converts theatre-quality images signals 1080p @60 Hz) to 72 Hz when displaying DVD images (e.g., movies) having 24 frames per second for smooth and vivid playback Text Off deactivates text optimization Optimization On improves subtitle display quality 63 En
-
 1
1 -
2
-
3
-
4
-
5
-
6
-
7
-
8
-
9
-
10
-
11
-
12
-
13
-
14
-
15
-
16
-
17
-
18
-
19
-
20
-
21
-
22
-
23
-
24
-
25
-
26
-
27
-
28
-
29
-
30
-
31
-
32
-
33
-
34
-
35
-
36
-
37
-
38
-
39
-
40
-
41
-
42
-
43
-
44
-
45
-
46
-
47
-
48
-
49
-
50
-
51
-
52
-
53
-
54
-
55
-
56
-
57
-
 58
58 -
 59
59 -
 60
60 -
 61
61 -
 62
62 -
 63
63 -
 64
64 -
 65
65 -
 66
66 -
 67
67 -
 68
68 -
69
-
70
-
71
-
72
-
73
-
74
-
75
-
76
-
77
-
78
-
79
-
80
-
81
-
82
-
83
-
84
-
85
-
86
-
87
-
88
-
89
-
90
-
91
-
92
-
93
-
94
-
95
-
96
-
97
-
98
-
99
-
100
-
101
-
102
-
103
-
104
-
105
-
106
-
107
-
108
-
109
-
110
-
111
-
112
-
113
-
114
-
115
-
116
-
117
-
118
-
119
-
120
-
121
-
122
-
123
-
124
-
125
-
126
-
127
-
128
-
129
-
130
-
131
-
132
-
133
-
134
-
135
-
136
-
137
-
138
-
139
-
140
-
141
-
142
-
143
-
144
-
145
-
146
-
147
-
148
-
149
-
150
-
151
-
152
-
153
-
154
-
155
-
156
-
157
-
158
-
159
-
160
-
161
-
162
-
163
-
164
-
165
-
166
-
167
 |
 |