Pioneer PRO 111FD Owner's Manual - Page 49
Option, Left Button, Right Button
 |
UPC - 012562887111
View all Pioneer PRO 111FD manuals
Add to My Manuals
Save this manual to your list of manuals |
Page 49 highlights
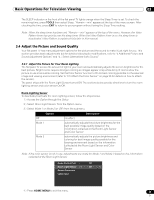
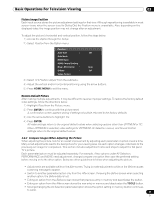
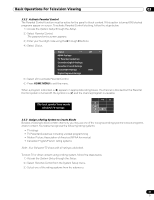
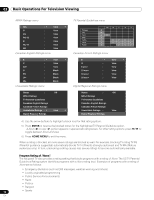
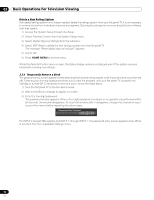
Basic Operations For Television Viewing 03 3.4.5 Sound Control Setting the Sound Control option to On automatically adjusts to the highest sound quality possible for the selected image and viewing environment. This option is also available when OPTIMUM is selected in the AV Selection menu. To activate Sound Control, follow the procedure below. 1 ) Access the Picture through the Setup. 2 ) Select AV Selection from the Picture menu. 3 ) Select OPTIMUM from the AV Selection menu. 4 ) Select Sound Control from the Picture menu. 5 ) Select On. 6 ) Press HOME MENU to exit the menu. Note: When Sound Control from the Picture menu is selected, the only Sound menu option available is AVC (Auto Volume Control). 3.4.6 General Sound (Audio) Adjustment Many prefer a heavier base when watching movies or music videos from an AV source or on TV. Others like a more balanced sound. To adjust the sound to your preference, follow the directions below. 1 ) Access the Sound through the Setup. 2 ) Select an option for adjustment. Treble Bass Balance Sound Effect Reset AVC : 0 : 0 : 0 : Off 3 ) Use the left/right arrow buttons (/) to adjust the option. Option Treble Base Balance Left Button Right Button weakens tone strengthens tone weakens tone strengthens tone shifts audio balance to the left shifts audio balance to the right 4 ) Press HOME MENU to exit the menu. Restore Default Sound Setting To restore the factory default sound settings, follow the directions below. 1 ) Highlight Reset from the Sound menu. 2 ) Press ENTER to continue with the sound reset. A confirmation screen appears asking if settings should be returned to the factory defaults. 3 ) Use the arrow buttons to highlight Yes. 4 ) Press ENTER to restore all sound settings to the original default values. Note: The Auto Volume Control (AVC) setting cannot be restored to the factory default. 49 En
-
 1
1 -
2
-
3
-
4
-
5
-
6
-
7
-
8
-
9
-
10
-
11
-
12
-
13
-
14
-
15
-
16
-
17
-
18
-
19
-
20
-
21
-
22
-
23
-
24
-
25
-
26
-
27
-
28
-
29
-
30
-
31
-
32
-
33
-
34
-
35
-
36
-
37
-
38
-
39
-
40
-
41
-
42
-
43
-
 44
44 -
 45
45 -
 46
46 -
 47
47 -
 48
48 -
 49
49 -
 50
50 -
 51
51 -
 52
52 -
 53
53 -
 54
54 -
55
-
56
-
57
-
58
-
59
-
60
-
61
-
62
-
63
-
64
-
65
-
66
-
67
-
68
-
69
-
70
-
71
-
72
-
73
-
74
-
75
-
76
-
77
-
78
-
79
-
80
-
81
-
82
-
83
-
84
-
85
-
86
-
87
-
88
-
89
-
90
-
91
-
92
-
93
-
94
-
95
-
96
-
97
-
98
-
99
-
100
-
101
-
102
-
103
-
104
-
105
-
106
-
107
-
108
-
109
-
110
-
111
-
112
-
113
-
114
-
115
-
116
-
117
-
118
-
119
-
120
-
121
-
122
-
123
-
124
-
125
-
126
-
127
-
128
-
129
-
130
-
131
-
132
-
133
-
134
-
135
-
136
-
137
-
138
-
139
-
140
-
141
-
142
-
143
-
144
-
145
-
146
-
147
-
148
-
149
-
150
-
151
-
152
-
153
-
154
-
155
-
156
-
157
-
158
-
159
-
160
-
161
-
162
-
163
-
164
-
165
-
166
-
167
 |
 |