Ricoh AC205 User's Guide - Page 250
Printing a Network Configuration Setting Network Protocols, If you selected TCP/IP
 |
View all Ricoh AC205 manuals
Add to My Manuals
Save this manual to your list of manuals |
Page 250 highlights
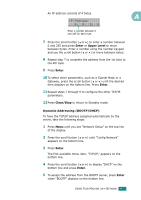
• DHCP: Dynamic Host Configuration Protocol • BOOTP: Bootstrap Protocol A Printing a Network Configuration Page The Network Configuration page shows how the network interface card on your machine is configured. The default settings which are suitable for most applications are enabled. 1 Press Menu until you see "Network Setup" on the top line of the display. 2 Press the scroll button ( or ) until "Print Net CFG" displays on the bottom line. 3 Press Enter. The first available menu item, "Yes," displays on the bottom line. 4 Press Enter. The Network Configuration page (NETWOR PRINTER CARD TEST PAGE) prints out. Setting Network Protocols When you first install the machine, all supported network protocols are enabled when you turn the machine on. If a network protocol is enabled, the machine may actively transmit on the network even when the protocol is not in use. This may increase network traffic slightly. To eliminate unnecessary traffic, you can disable unused protocols. 1 Press Menu until you see "Network Setup" on the top line of the display. 2 Press the scroll button ( or ) until "Config Network" displays on the bottom line. 3 Press Enter to access the menu. 4 Press the scroll button ( or ) until you see the desired protocol on the bottom line. 5 Press Enter. If you selected "TCP/IP," assign a TCP/IP address. For details, see page A.6. USING YOUR MACHINE ON A NETWORK A.5
-
 1
1 -
2
-
3
-
4
-
5
-
6
-
7
-
8
-
9
-
10
-
11
-
12
-
13
-
14
-
15
-
16
-
17
-
18
-
19
-
20
-
21
-
22
-
23
-
24
-
25
-
26
-
27
-
28
-
29
-
30
-
31
-
32
-
33
-
34
-
35
-
36
-
37
-
38
-
39
-
40
-
41
-
42
-
43
-
44
-
45
-
46
-
47
-
48
-
49
-
50
-
51
-
52
-
53
-
54
-
55
-
56
-
57
-
58
-
59
-
60
-
61
-
62
-
63
-
64
-
65
-
66
-
67
-
68
-
69
-
70
-
71
-
72
-
73
-
74
-
75
-
76
-
77
-
78
-
79
-
80
-
81
-
82
-
83
-
84
-
85
-
86
-
87
-
88
-
89
-
90
-
91
-
92
-
93
-
94
-
95
-
96
-
97
-
98
-
99
-
100
-
101
-
102
-
103
-
104
-
105
-
106
-
107
-
108
-
109
-
110
-
111
-
112
-
113
-
114
-
115
-
116
-
117
-
118
-
119
-
120
-
121
-
122
-
123
-
124
-
125
-
126
-
127
-
128
-
129
-
130
-
131
-
132
-
133
-
134
-
135
-
136
-
137
-
138
-
139
-
140
-
141
-
142
-
143
-
144
-
145
-
146
-
147
-
148
-
149
-
150
-
151
-
152
-
153
-
154
-
155
-
156
-
157
-
158
-
159
-
160
-
161
-
162
-
163
-
164
-
165
-
166
-
167
-
168
-
169
-
170
-
171
-
172
-
173
-
174
-
175
-
176
-
177
-
178
-
179
-
180
-
181
-
182
-
183
-
184
-
185
-
186
-
187
-
188
-
189
-
190
-
191
-
192
-
193
-
194
-
195
-
196
-
197
-
198
-
199
-
200
-
201
-
202
-
203
-
204
-
205
-
206
-
207
-
208
-
209
-
210
-
211
-
212
-
213
-
214
-
215
-
216
-
217
-
218
-
219
-
220
-
221
-
222
-
223
-
224
-
225
-
226
-
227
-
228
-
229
-
230
-
231
-
232
-
233
-
234
-
235
-
236
-
237
-
238
-
239
-
240
-
241
-
242
-
243
-
244
-
 245
245 -
 246
246 -
 247
247 -
 248
248 -
 249
249 -
 250
250 -
 251
251 -
 252
252 -
 253
253 -
 254
254 -
 255
255 -
256
-
257
-
258
-
259
-
260
-
261
-
262
-
263
-
264
-
265
-
266
-
267
-
268
-
269
-
270
-
271
-
272
-
273
-
274
-
275
-
276
-
277
-
278
 |
 |