Ricoh AC205 User's Guide - Page 75
The Printer Tab, Group dial, Printer
 |
View all Ricoh AC205 manuals
Add to My Manuals
Save this manual to your list of manuals |
Page 75 highlights
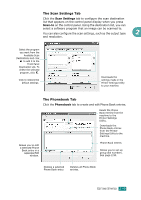
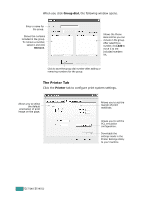
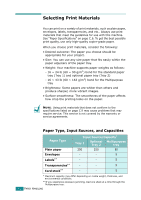
When you click Group dial, the following window opens. Enter a name for the group. Shows the numbers included in the group. To remove a number, select it and click Remove. Shows the Phone Book entries you can include in the group. After selecting a number, click Add to move it to the Included numbers list. Click to save the group dial number after adding or removing numbers for the group. The Printer Tab Click the Printer tab to configure print system settings. Allows you to select the default orientation of print image on the page. Allows you to set the margin of print materials. Allows you to set the PCL emulation configuration. Downloads the settings made in the Printer Settings Utility to your machine. 2.50 GETTING STARTED
-
 1
1 -
2
-
3
-
4
-
5
-
6
-
7
-
8
-
9
-
10
-
11
-
12
-
13
-
14
-
15
-
16
-
17
-
18
-
19
-
20
-
21
-
22
-
23
-
24
-
25
-
26
-
27
-
28
-
29
-
30
-
31
-
32
-
33
-
34
-
35
-
36
-
37
-
38
-
39
-
40
-
41
-
42
-
43
-
44
-
45
-
46
-
47
-
48
-
49
-
50
-
51
-
52
-
53
-
54
-
55
-
56
-
57
-
58
-
59
-
60
-
61
-
62
-
63
-
64
-
65
-
66
-
67
-
68
-
69
-
 70
70 -
 71
71 -
 72
72 -
 73
73 -
 74
74 -
 75
75 -
 76
76 -
 77
77 -
 78
78 -
 79
79 -
 80
80 -
81
-
82
-
83
-
84
-
85
-
86
-
87
-
88
-
89
-
90
-
91
-
92
-
93
-
94
-
95
-
96
-
97
-
98
-
99
-
100
-
101
-
102
-
103
-
104
-
105
-
106
-
107
-
108
-
109
-
110
-
111
-
112
-
113
-
114
-
115
-
116
-
117
-
118
-
119
-
120
-
121
-
122
-
123
-
124
-
125
-
126
-
127
-
128
-
129
-
130
-
131
-
132
-
133
-
134
-
135
-
136
-
137
-
138
-
139
-
140
-
141
-
142
-
143
-
144
-
145
-
146
-
147
-
148
-
149
-
150
-
151
-
152
-
153
-
154
-
155
-
156
-
157
-
158
-
159
-
160
-
161
-
162
-
163
-
164
-
165
-
166
-
167
-
168
-
169
-
170
-
171
-
172
-
173
-
174
-
175
-
176
-
177
-
178
-
179
-
180
-
181
-
182
-
183
-
184
-
185
-
186
-
187
-
188
-
189
-
190
-
191
-
192
-
193
-
194
-
195
-
196
-
197
-
198
-
199
-
200
-
201
-
202
-
203
-
204
-
205
-
206
-
207
-
208
-
209
-
210
-
211
-
212
-
213
-
214
-
215
-
216
-
217
-
218
-
219
-
220
-
221
-
222
-
223
-
224
-
225
-
226
-
227
-
228
-
229
-
230
-
231
-
232
-
233
-
234
-
235
-
236
-
237
-
238
-
239
-
240
-
241
-
242
-
243
-
244
-
245
-
246
-
247
-
248
-
249
-
250
-
251
-
252
-
253
-
254
-
255
-
256
-
257
-
258
-
259
-
260
-
261
-
262
-
263
-
264
-
265
-
266
-
267
-
268
-
269
-
270
-
271
-
272
-
273
-
274
-
275
-
276
-
277
-
278
 |
 |

G
ETTING
S
TARTED
2.50
When you click
Group dial
, the following window opens.
The Printer Tab
Click the
Printer
tab to configure print system settings.
Shows the Phone
Book entries you can
include in the group.
After selecting a
number, click
Add
to
move it to the
Included numbers
list.
Enter a name for
the group.
Shows the numbers
included in the group.
To remove a number,
select it and click
Remove
.
Click to save the group dial number after adding or
removing numbers for the group.
Downloads the
settings made in the
Printer Settings Utility
to your machine.
Allows you to select
the default
orientation of print
image on the page.
Allows you to set the
margin of print
materials.
Allows you to set the
PCL emulation
configuration.