Ricoh AC205 User's Guide - Page 56
Custom Installation for local printing, After setup is complete, if your printer driver doesn't work - drivers for windows 8 1
 |
View all Ricoh AC205 manuals
Add to My Manuals
Save this manual to your list of manuals |
Page 56 highlights
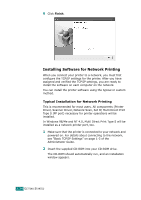
6 If the test page prints out correctly, click Yes. If not, click No to reprint it. 7 Click Finish. 2 NOTE: After setup is complete, if your printer driver doesn't work properly, reinstall the printer driver. See "Repairing Software" on page 2.43. Custom Installation for local printing You can choose individual components to install. 1 Make sure that the printer is connected to your computer and powered on. 2 Insert the supplied CD-ROM into your CD-ROM drive. The CD-ROM should automatically run, and an installation window appears. If the installation window does not appear, click Start and then Run. Type X:\setup.exe, replacing "X" with the letter which represents your drive and click OK. GETTING STARTED 2.31
-
 1
1 -
2
-
3
-
4
-
5
-
6
-
7
-
8
-
9
-
10
-
11
-
12
-
13
-
14
-
15
-
16
-
17
-
18
-
19
-
20
-
21
-
22
-
23
-
24
-
25
-
26
-
27
-
28
-
29
-
30
-
31
-
32
-
33
-
34
-
35
-
36
-
37
-
38
-
39
-
40
-
41
-
42
-
43
-
44
-
45
-
46
-
47
-
48
-
49
-
50
-
 51
51 -
 52
52 -
 53
53 -
 54
54 -
 55
55 -
 56
56 -
 57
57 -
 58
58 -
 59
59 -
 60
60 -
 61
61 -
62
-
63
-
64
-
65
-
66
-
67
-
68
-
69
-
70
-
71
-
72
-
73
-
74
-
75
-
76
-
77
-
78
-
79
-
80
-
81
-
82
-
83
-
84
-
85
-
86
-
87
-
88
-
89
-
90
-
91
-
92
-
93
-
94
-
95
-
96
-
97
-
98
-
99
-
100
-
101
-
102
-
103
-
104
-
105
-
106
-
107
-
108
-
109
-
110
-
111
-
112
-
113
-
114
-
115
-
116
-
117
-
118
-
119
-
120
-
121
-
122
-
123
-
124
-
125
-
126
-
127
-
128
-
129
-
130
-
131
-
132
-
133
-
134
-
135
-
136
-
137
-
138
-
139
-
140
-
141
-
142
-
143
-
144
-
145
-
146
-
147
-
148
-
149
-
150
-
151
-
152
-
153
-
154
-
155
-
156
-
157
-
158
-
159
-
160
-
161
-
162
-
163
-
164
-
165
-
166
-
167
-
168
-
169
-
170
-
171
-
172
-
173
-
174
-
175
-
176
-
177
-
178
-
179
-
180
-
181
-
182
-
183
-
184
-
185
-
186
-
187
-
188
-
189
-
190
-
191
-
192
-
193
-
194
-
195
-
196
-
197
-
198
-
199
-
200
-
201
-
202
-
203
-
204
-
205
-
206
-
207
-
208
-
209
-
210
-
211
-
212
-
213
-
214
-
215
-
216
-
217
-
218
-
219
-
220
-
221
-
222
-
223
-
224
-
225
-
226
-
227
-
228
-
229
-
230
-
231
-
232
-
233
-
234
-
235
-
236
-
237
-
238
-
239
-
240
-
241
-
242
-
243
-
244
-
245
-
246
-
247
-
248
-
249
-
250
-
251
-
252
-
253
-
254
-
255
-
256
-
257
-
258
-
259
-
260
-
261
-
262
-
263
-
264
-
265
-
266
-
267
-
268
-
269
-
270
-
271
-
272
-
273
-
274
-
275
-
276
-
277
-
278
 |
 |
2
G
ETTING
S
TARTED
2.31
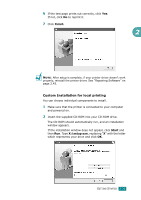
6
If the test page prints out correctly, click
Yes
.
If not, click
No
to reprint it.
7
Click
Finish
.
N
OTE
: After setup is complete, if your printer driver doesn’t work
properly, reinstall the printer driver.
See “Repairing Software” on
page 2.43.
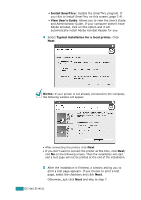
Custom Installation for local printing
You can choose individual components to install.
1
Make sure that the printer is connected to your computer
and powered on.
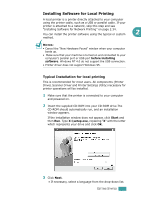
2
Insert the supplied CD-ROM into your CD-ROM drive.
The CD-ROM should automatically run, and an installation
window appears.
If the installation window does not appear, click
Start
and
then
Run
. Type
X:\setup.exe
, replacing “
X
” with the letter
which represents your drive and click
OK
.