Samsung SPH-M350 User Manual (user Manual) (ver.f7) (English) - Page 75
Assigning a Picture to an Entry
 |
View all Samsung SPH-M350 manuals
Add to My Manuals
Save this manual to your list of manuals |
Page 75 highlights
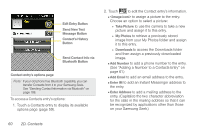
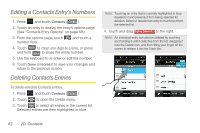
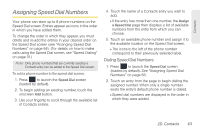
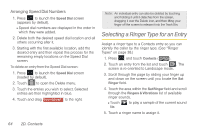
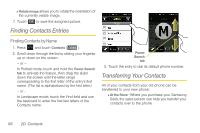
Contacts 6. Touch Done (onscreen) to save the new ringer type. Assigning a Picture to an Entry Assign a picture to display each time a certain contact calls you. 1. Press and touch Contacts ( Contacts ). 2. Touch an entry from the list and touch . The screen is re-oriented to Landscape mode. 3. Touch the picture icon (adjacent to the entry name at the top left of the screen) to display the ADD PHOTO menu. 4. Select an option, such as Take Picture, My Photos, or Downloads. 5. Navigate to and locate a picture and touch it to begin editing the image prior to assignment. Ⅲ If you selected Take New Picture, the camera will launch and you will use it to take a new picture. (See "2H. Camera" on page 68 for details.) Ⅲ If you selected Downloads, you may need to select to download an image. Resize slider Accept Visible area Rotate image 6. Adjust the image size and orientation using the onscreen tools: Ⅲ Resize slider allows you to zoom in and out on the current image. The red square indicates the area used by the Contacts entry image icon. Ⅲ Accept closes the edit session and assigns the current image to the active Contacts entry. Ⅲ Visible area indicates the available area used by the Contacts image. 2D. Contacts 65
-
 1
1 -
2
-
3
-
4
-
5
-
6
-
7
-
8
-
9
-
10
-
11
-
12
-
13
-
14
-
15
-
16
-
17
-
18
-
19
-
20
-
21
-
22
-
23
-
24
-
25
-
26
-
27
-
28
-
29
-
30
-
31
-
32
-
33
-
34
-
35
-
36
-
37
-
38
-
39
-
40
-
41
-
42
-
43
-
44
-
45
-
46
-
47
-
48
-
49
-
50
-
51
-
52
-
53
-
54
-
55
-
56
-
57
-
58
-
59
-
60
-
61
-
62
-
63
-
64
-
65
-
66
-
67
-
68
-
69
-
 70
70 -
 71
71 -
 72
72 -
 73
73 -
 74
74 -
 75
75 -
 76
76 -
 77
77 -
 78
78 -
 79
79 -
 80
80 -
81
-
82
-
83
-
84
-
85
-
86
-
87
-
88
-
89
-
90
-
91
-
92
-
93
-
94
-
95
-
96
-
97
-
98
-
99
-
100
-
101
-
102
-
103
-
104
-
105
-
106
-
107
-
108
-
109
-
110
-
111
-
112
-
113
-
114
-
115
-
116
-
117
-
118
-
119
-
120
-
121
-
122
-
123
-
124
-
125
-
126
-
127
-
128
-
129
-
130
-
131
-
132
-
133
-
134
-
135
-
136
-
137
-
138
-
139
-
140
-
141
-
142
-
143
-
144
-
145
-
146
-
147
-
148
-
149
-
150
-
151
-
152
-
153
-
154
-
155
-
156
-
157
-
158
-
159
-
160
-
161
-
162
-
163
-
164
-
165
-
166
-
167
-
168
-
169
-
170
-
171
-
172
-
173
-
174
-
175
-
176
-
177
-
178
-
179
-
180
-
181
-
182
-
183
-
184
-
185
-
186
-
187
-
188
-
189
-
190
-
191
-
192
 |
 |