Western Digital WD20000H1NC User Manual - Page 147
Users, Grant Administration Rights, User Name, Full Name, Password, Confirm Password, Group, >>
 |
View all Western Digital WD20000H1NC manuals
Add to My Manuals
Save this manual to your list of manuals |
Page 147 highlights
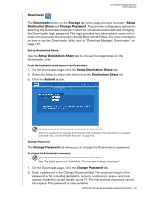
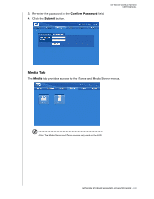
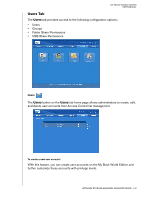
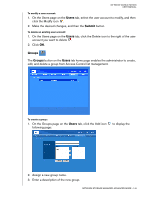
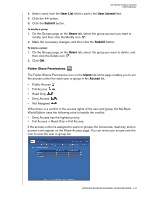
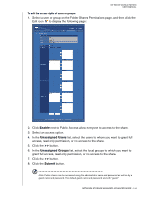
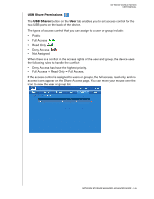
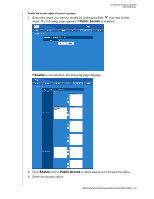
1. On the Users page on the Users tab, click the Add icon following page: MY BOOK WORLD EDITION USER MANUAL to display the Note: The user name and password can contain up to 15 characters, including alphabetic, numeric, underscore, space, and most special characters. 2. Click Grant Administration Rights to provide the user with administrative rights. Administrative rights allow the user to configure the device. Note: The password can contain up to 16 characters, including alphabetic, numeric, underscore, space, and most special characters except double-quote ("). The first and last characters cannot be a space. The password is case sensitive. 3. Enter the user name in the User Name field. 4. Enter the user's full name in the Full Name field. 5. Enter the password in the Password field. 6. Re-enter the password in the Confirm Password field. 7. If desired, select a previously created Group for the user to join from the Group List. 8. Click the >> button to add the selected user to the group. 9. You may create a private user share at the same time by clicking Yes next to Create User Private Share. The new user is granted Full Access to the private share. The private share name is the same as the user name. Nobody else has access to this private share unless it is specifically granted by the administrator. 10. Select a volume that you want the user to access. (My Book World Edition II only) 11. Select one or more file sharing protocols to access private shares. 12. Click the Submit button. NETWORK STORAGE MANAGER: ADVANCED MODE - 141
-
 1
1 -
2
-
3
-
4
-
5
-
6
-
7
-
8
-
9
-
10
-
11
-
12
-
13
-
14
-
15
-
16
-
17
-
18
-
19
-
20
-
21
-
22
-
23
-
24
-
25
-
26
-
27
-
28
-
29
-
30
-
31
-
32
-
33
-
34
-
35
-
36
-
37
-
38
-
39
-
40
-
41
-
42
-
43
-
44
-
45
-
46
-
47
-
48
-
49
-
50
-
51
-
52
-
53
-
54
-
55
-
56
-
57
-
58
-
59
-
60
-
61
-
62
-
63
-
64
-
65
-
66
-
67
-
68
-
69
-
70
-
71
-
72
-
73
-
74
-
75
-
76
-
77
-
78
-
79
-
80
-
81
-
82
-
83
-
84
-
85
-
86
-
87
-
88
-
89
-
90
-
91
-
92
-
93
-
94
-
95
-
96
-
97
-
98
-
99
-
100
-
101
-
102
-
103
-
104
-
105
-
106
-
107
-
108
-
109
-
110
-
111
-
112
-
113
-
114
-
115
-
116
-
117
-
118
-
119
-
120
-
121
-
122
-
123
-
124
-
125
-
126
-
127
-
128
-
129
-
130
-
131
-
132
-
133
-
134
-
135
-
136
-
137
-
138
-
139
-
140
-
141
-
 142
142 -
 143
143 -
 144
144 -
 145
145 -
 146
146 -
 147
147 -
 148
148 -
 149
149 -
 150
150 -
 151
151 -
 152
152 -
153
-
154
-
155
-
156
-
157
-
158
-
159
-
160
-
161
-
162
-
163
-
164
-
165
-
166
-
167
-
168
-
169
-
170
-
171
-
172
-
173
-
174
-
175
-
176
-
177
-
178
-
179
-
180
-
181
-
182
-
183
-
184
-
185
-
186
-
187
-
188
-
189
-
190
-
191
-
192
-
193
-
194
-
195
-
196
-
197
-
198
 |
 |
