Dell 3130cn User's Guide (PDF) - Page 118
Apply New Settings, Odd Sided
 |
UPC - 335531305295
View all Dell 3130cn manuals
Add to My Manuals
Save this manual to your list of manuals |
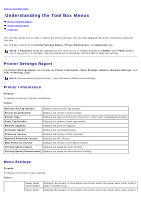
Page 118 highlights
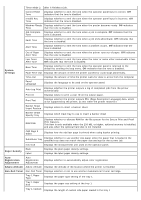
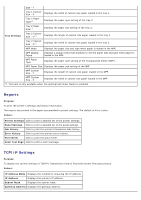
French Italian German Panel Language Spanish Specifies the language to be used on the operator panel. Dutch Danish Norwegian Swedish Auto Log Print Off* On Does not automatically output a log of completed jobs from the printer. Outputs a log of completed jobs from the printer automatically. Off* Does not print the user ID. Top Left Print ID Top Right Bottom Left Prints the user ID on the specified location. Bottom Right Print Text Off On* Does not print the received PDL data as text data. Prints the received PDL data as text data. Off* Does not insert the banner sheet. Banner Sheet Insert Position Front Back Inserts the banner sheet to the specified position. Front & Back Banner Sheet Specify Tray Tray 1* Tray 2*2 MPF Specifies the input tray to insert the banner sheet. RAM Disk*3 Disable 50-500MB*4 50-1000MB*5 Does not allocate RAM for the disk file system. Secure Print, and Proof Print jobs will abort and be recorded to the job log. Allocates RAM for the disk file system automatically. 1 Sided* Odd Page 2 Sided 2 Sided Prints the odd last page upside down to the paper Prints the odd last page in normal direction to the paper Off* No tray size substitute accepted. Substitute Tray Larger Size Nearest Size Substitutes paper of next largest size. When there is no larger paper size, the printer substitutes paper of nearest size. Substitutes paper of nearest size. MPF Feed Substitutes paper in the MPF. mm/inch millimeter (mm)* inch (")*6 Selects millimeter or inch as the default measurement unit. Apply New Settings After you complete the settings, press the Apply New Settings button to apply the changes. Restart printer to apply new settings Press the Restart printer to apply new settings button to apply the changes. *1 Enter 5 to put the printer in the power saver timer mode five minutes after it finishes a job. This uses much less energy, but requires more warm-up time for the printer. Enter 5if your printer shares an electrical circuit with room lighting and you notice lights flickering. Select a high value if your printer is in constant use. Under most circumstances, this keeps the printer ready to operate
-
 1
1 -
2
-
3
-
4
-
5
-
6
-
7
-
8
-
9
-
10
-
11
-
12
-
13
-
14
-
15
-
16
-
17
-
18
-
19
-
20
-
21
-
22
-
23
-
24
-
25
-
26
-
27
-
28
-
29
-
30
-
31
-
32
-
33
-
34
-
35
-
36
-
37
-
38
-
39
-
40
-
41
-
42
-
43
-
44
-
45
-
46
-
47
-
48
-
49
-
50
-
51
-
52
-
53
-
54
-
55
-
56
-
57
-
58
-
59
-
60
-
61
-
62
-
63
-
64
-
65
-
66
-
67
-
68
-
69
-
70
-
71
-
72
-
73
-
74
-
75
-
76
-
77
-
78
-
79
-
80
-
81
-
82
-
83
-
84
-
85
-
86
-
87
-
88
-
89
-
90
-
91
-
92
-
93
-
94
-
95
-
96
-
97
-
98
-
99
-
100
-
101
-
102
-
103
-
104
-
105
-
106
-
107
-
108
-
109
-
110
-
111
-
112
-
 113
113 -
 114
114 -
 115
115 -
 116
116 -
 117
117 -
 118
118 -
 119
119 -
 120
120 -
 121
121 -
 122
122 -
 123
123 -
124
-
125
-
126
-
127
-
128
-
129
-
130
-
131
-
132
-
133
-
134
-
135
-
136
-
137
-
138
-
139
-
140
-
141
-
142
-
143
-
144
-
145
-
146
-
147
-
148
-
149
-
150
-
151
-
152
-
153
-
154
-
155
-
156
-
157
-
158
-
159
-
160
-
161
-
162
-
163
-
164
-
165
-
166
-
167
-
168
-
169
-
170
-
171
-
172
-
173
-
174
-
175
-
176
-
177
-
178
-
179
-
180
-
181
-
182
-
183
-
184
-
185
-
186
-
187
-
188
-
189
-
190
-
191
-
192
-
193
-
194
-
195
-
196
-
197
-
198
-
199
-
200
-
201
-
202
-
203
-
204
-
205
-
206
-
207
-
208
-
209
-
210
-
211
-
212
-
213
-
214
-
215
-
216
-
217
-
218
-
219
-
220
-
221
-
222
-
223
-
224
-
225
-
226
-
227
-
228
-
229
-
230
-
231
-
232
-
233
-
234
-
235
-
236
-
237
-
238
-
239
-
240
-
241
-
242
-
243
-
244
-
245
-
246
-
247
-
248
-
249
-
250
-
251
-
252
-
253
-
254
-
255
-
256
-
257
-
258
-
259
-
260
-
261
-
262
-
263
-
264
-
265
-
266
-
267
-
268
-
269
-
270
-
271
-
272
-
273
-
274
-
275
-
276
-
277
-
278
-
279
-
280
-
281
-
282
-
283
-
284
-
285
-
286
-
287
-
288
-
289
-
290
-
291
-
292
-
293
-
294
-
295
-
296
-
297
-
298
-
299
-
300
-
301
-
302
-
303
-
304
-
305
-
306
-
307
-
308
 |
 |