Dell 3130cn User's Guide (PDF) - Page 177
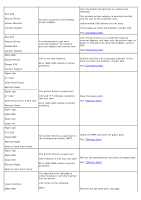
Clearing Jams:, Avoiding Jams, Identifying the Location of Paper Jams - printing lines down paper
 |
UPC - 335531305295
View all Dell 3130cn manuals
Add to My Manuals
Save this manual to your list of manuals |
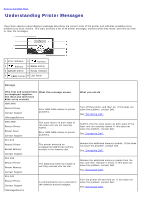
Page 177 highlights
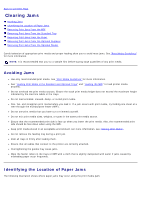
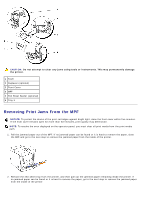
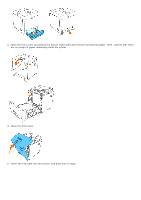
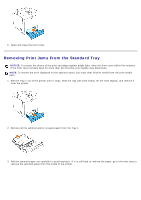
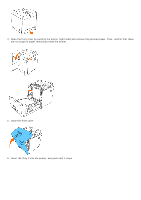
Back to Contents Page Clearing Jams Avoiding Jams Identifying the Location of Paper Jams Removing Print Jams From the MPF Removing Print Jams From the Standard Tray Removing Print Jams From the Fuser Removing Print Jams From the Optional Duplexer Removing Print Jams From the Optional Feeder Careful selection of appropriate print media and proper loading allow you to avoid most jams. See "Print Media Guidelines" for more information. NOTE: It is recommended that you try a sample first before buying large quantities of any print media. Avoiding Jams Use only recommended print media. See "Print Media Guidelines" for more information. See "Loading Print Media in the Standard and Optional Trays" and "Loading the MPF" to load printer media properly. Do not overload the print media sources. Ensure the stack print media height does not exceed the maximum height indicated by the load line labels in the trays. Do not load wrinkled, creased, damp, or curled print media. Flex, fan, and straighten print media before you load it. If a jam occurs with print media, try feeding one sheet at a time through the multipurpose feeder (MPF). Do not use print media that you have cut or trimmed yourself. Do not mix print media sizes, weights, or types in the same print media source. Ensure that the recommended print side is face up when you insert the print media. Also, the recommended print side should be face down when using the MPF. Keep print media stored in an acceptable environment. For more information, see "Storing Print Media". Do not remove the feeding tray during a print job. Push all trays in firmly after loading them. Ensure that all cables that connect to the printer are correctly attached. Overtightening the guides may cause jams. Wipe the feeder rollers in the trays or MPF with a cloth that is slightly dampened with water if jams caused by misfeeding paper occur frequently. Identifying the Location of Paper Jams The following illustration shows where paper jams may occur along the print media path.
-
 1
1 -
2
-
3
-
4
-
5
-
6
-
7
-
8
-
9
-
10
-
11
-
12
-
13
-
14
-
15
-
16
-
17
-
18
-
19
-
20
-
21
-
22
-
23
-
24
-
25
-
26
-
27
-
28
-
29
-
30
-
31
-
32
-
33
-
34
-
35
-
36
-
37
-
38
-
39
-
40
-
41
-
42
-
43
-
44
-
45
-
46
-
47
-
48
-
49
-
50
-
51
-
52
-
53
-
54
-
55
-
56
-
57
-
58
-
59
-
60
-
61
-
62
-
63
-
64
-
65
-
66
-
67
-
68
-
69
-
70
-
71
-
72
-
73
-
74
-
75
-
76
-
77
-
78
-
79
-
80
-
81
-
82
-
83
-
84
-
85
-
86
-
87
-
88
-
89
-
90
-
91
-
92
-
93
-
94
-
95
-
96
-
97
-
98
-
99
-
100
-
101
-
102
-
103
-
104
-
105
-
106
-
107
-
108
-
109
-
110
-
111
-
112
-
113
-
114
-
115
-
116
-
117
-
118
-
119
-
120
-
121
-
122
-
123
-
124
-
125
-
126
-
127
-
128
-
129
-
130
-
131
-
132
-
133
-
134
-
135
-
136
-
137
-
138
-
139
-
140
-
141
-
142
-
143
-
144
-
145
-
146
-
147
-
148
-
149
-
150
-
151
-
152
-
153
-
154
-
155
-
156
-
157
-
158
-
159
-
160
-
161
-
162
-
163
-
164
-
165
-
166
-
167
-
168
-
169
-
170
-
171
-
 172
172 -
 173
173 -
 174
174 -
 175
175 -
 176
176 -
 177
177 -
 178
178 -
 179
179 -
 180
180 -
 181
181 -
 182
182 -
183
-
184
-
185
-
186
-
187
-
188
-
189
-
190
-
191
-
192
-
193
-
194
-
195
-
196
-
197
-
198
-
199
-
200
-
201
-
202
-
203
-
204
-
205
-
206
-
207
-
208
-
209
-
210
-
211
-
212
-
213
-
214
-
215
-
216
-
217
-
218
-
219
-
220
-
221
-
222
-
223
-
224
-
225
-
226
-
227
-
228
-
229
-
230
-
231
-
232
-
233
-
234
-
235
-
236
-
237
-
238
-
239
-
240
-
241
-
242
-
243
-
244
-
245
-
246
-
247
-
248
-
249
-
250
-
251
-
252
-
253
-
254
-
255
-
256
-
257
-
258
-
259
-
260
-
261
-
262
-
263
-
264
-
265
-
266
-
267
-
268
-
269
-
270
-
271
-
272
-
273
-
274
-
275
-
276
-
277
-
278
-
279
-
280
-
281
-
282
-
283
-
284
-
285
-
286
-
287
-
288
-
289
-
290
-
291
-
292
-
293
-
294
-
295
-
296
-
297
-
298
-
299
-
300
-
301
-
302
-
303
-
304
-
305
-
306
-
307
-
308
 |
 |