Dell 3130cn User's Guide (PDF) - Page 53
Memory Capacity, General, Report/List, Printer Setting
 |
UPC - 335531305295
View all Dell 3130cn manuals
Add to My Manuals
Save this manual to your list of manuals |
Page 53 highlights
5. Pivot the memory downward until it clicks into place. NOTE: Ensure that the memory is firmly fixed in the slot and cannot be moved easily. 6. Close the control board cover and turn the screw clockwise. 7. Turn on the printer. 8. Print a printer settings page to verify that the memory is installed correctly. When Using the Operator Panel a. Press Menu button. b. Press button until Report/List appears, and then press (Set) button. c. Printer Setting is displayed. Press (Set) button. The printer settings page is printed. d. Verify Memory Capacity listed in the printer settings under General. If the memory capacity has not increased, turn off the printer, unplug the power cable, and reinstall the memory. When Using the Tool Box
-
 1
1 -
2
-
3
-
4
-
5
-
6
-
7
-
8
-
9
-
10
-
11
-
12
-
13
-
14
-
15
-
16
-
17
-
18
-
19
-
20
-
21
-
22
-
23
-
24
-
25
-
26
-
27
-
28
-
29
-
30
-
31
-
32
-
33
-
34
-
35
-
36
-
37
-
38
-
39
-
40
-
41
-
42
-
43
-
44
-
45
-
46
-
47
-
 48
48 -
 49
49 -
 50
50 -
 51
51 -
 52
52 -
 53
53 -
 54
54 -
 55
55 -
 56
56 -
 57
57 -
 58
58 -
59
-
60
-
61
-
62
-
63
-
64
-
65
-
66
-
67
-
68
-
69
-
70
-
71
-
72
-
73
-
74
-
75
-
76
-
77
-
78
-
79
-
80
-
81
-
82
-
83
-
84
-
85
-
86
-
87
-
88
-
89
-
90
-
91
-
92
-
93
-
94
-
95
-
96
-
97
-
98
-
99
-
100
-
101
-
102
-
103
-
104
-
105
-
106
-
107
-
108
-
109
-
110
-
111
-
112
-
113
-
114
-
115
-
116
-
117
-
118
-
119
-
120
-
121
-
122
-
123
-
124
-
125
-
126
-
127
-
128
-
129
-
130
-
131
-
132
-
133
-
134
-
135
-
136
-
137
-
138
-
139
-
140
-
141
-
142
-
143
-
144
-
145
-
146
-
147
-
148
-
149
-
150
-
151
-
152
-
153
-
154
-
155
-
156
-
157
-
158
-
159
-
160
-
161
-
162
-
163
-
164
-
165
-
166
-
167
-
168
-
169
-
170
-
171
-
172
-
173
-
174
-
175
-
176
-
177
-
178
-
179
-
180
-
181
-
182
-
183
-
184
-
185
-
186
-
187
-
188
-
189
-
190
-
191
-
192
-
193
-
194
-
195
-
196
-
197
-
198
-
199
-
200
-
201
-
202
-
203
-
204
-
205
-
206
-
207
-
208
-
209
-
210
-
211
-
212
-
213
-
214
-
215
-
216
-
217
-
218
-
219
-
220
-
221
-
222
-
223
-
224
-
225
-
226
-
227
-
228
-
229
-
230
-
231
-
232
-
233
-
234
-
235
-
236
-
237
-
238
-
239
-
240
-
241
-
242
-
243
-
244
-
245
-
246
-
247
-
248
-
249
-
250
-
251
-
252
-
253
-
254
-
255
-
256
-
257
-
258
-
259
-
260
-
261
-
262
-
263
-
264
-
265
-
266
-
267
-
268
-
269
-
270
-
271
-
272
-
273
-
274
-
275
-
276
-
277
-
278
-
279
-
280
-
281
-
282
-
283
-
284
-
285
-
286
-
287
-
288
-
289
-
290
-
291
-
292
-
293
-
294
-
295
-
296
-
297
-
298
-
299
-
300
-
301
-
302
-
303
-
304
-
305
-
306
-
307
-
308
 |
 |

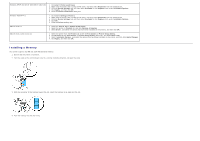
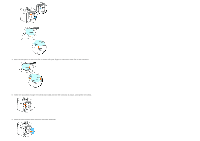
5. Pivot the memory downward until it clicks into place.
NOTE:
Ensure that the memory is firmly fixed in the slot and cannot be moved easily.
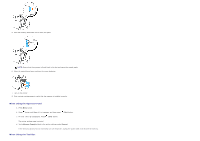
6. Close the control board cover and turn the screw clockwise.
7. Turn on the printer.
8. Print a printer settings page to verify that the memory is installed correctly.
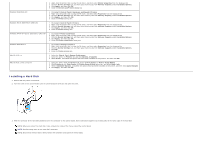
When Using the Operator Panel
a. Press
Menu
button.
b. Press
button until
Report/List
appears, and then press
(Set)
button.
c.
Printer Setting
is displayed
.
Press
(Set)
button.
The printer settings page is printed.
d. Verify
Memory Capacity
listed in the printer settings under
General
.
If the memory capacity has not increased, turn off the printer, unplug the power cable, and reinstall the memory.
When Using the Tool Box