Dell PowerEdge R815 Hardware Owner's Manual - Page 86
Removing a Power Supply, Power Supply Blank - rack chassis
 |
View all Dell PowerEdge R815 manuals
Add to My Manuals
Save this manual to your list of manuals |
Page 86 highlights
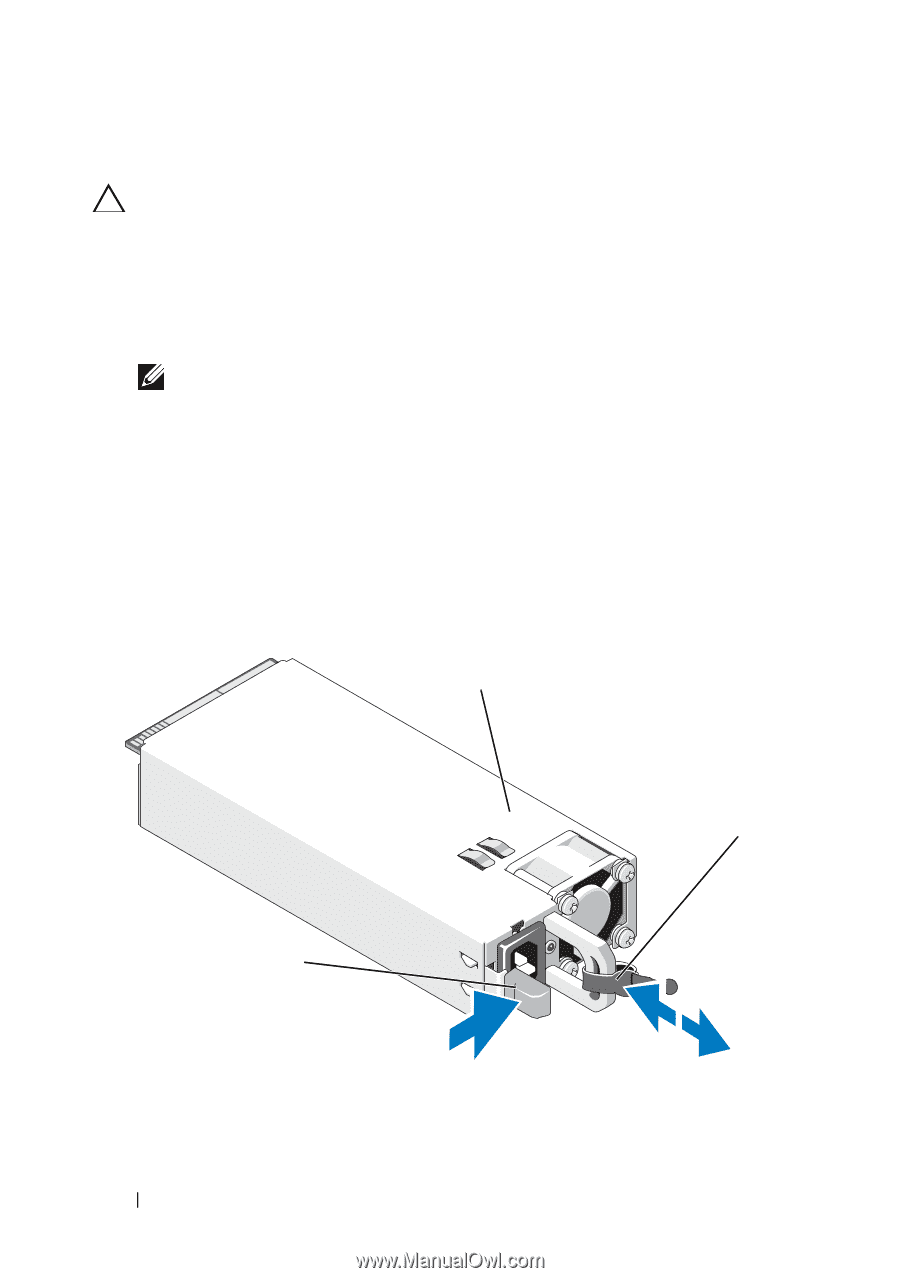
Removing a Power Supply CAUTION: The system requires one power supply for normal operation. On power-redundant systems, remove and replace only one power supply at a time in a system that is powered on. 1 Disconnect the power cable from the power source. 2 Disconnect the power cable from the power supply and remove the Velcro straps that bundle and secure the system cables. NOTE: You may have to unlatch and lift the optional cable management arm if it interferes with power-supply removal. For information about the cable management arm, see the system's rack documentation. 3 Press the release latch and pull the power supply out to release it from the power distribution board and clear the chassis. If you are permanently removing the power supply, you must install a power supply blank to ensure proper system cooling. See "Installing the Power Supply Blank" on page 87. Figure 3-8. Removing and Installing a Power Supply 1 2 3 1 power supply 3 release latch 2 velcro strap 86 Installing System Components
-
 1
1 -
2
-
3
-
4
-
5
-
6
-
7
-
8
-
9
-
10
-
11
-
12
-
13
-
14
-
15
-
16
-
17
-
18
-
19
-
20
-
21
-
22
-
23
-
24
-
25
-
26
-
27
-
28
-
29
-
30
-
31
-
32
-
33
-
34
-
35
-
36
-
37
-
38
-
39
-
40
-
41
-
42
-
43
-
44
-
45
-
46
-
47
-
48
-
49
-
50
-
51
-
52
-
53
-
54
-
55
-
56
-
57
-
58
-
59
-
60
-
61
-
62
-
63
-
64
-
65
-
66
-
67
-
68
-
69
-
70
-
71
-
72
-
73
-
74
-
75
-
76
-
77
-
78
-
79
-
80
-
 81
81 -
 82
82 -
 83
83 -
 84
84 -
 85
85 -
 86
86 -
 87
87 -
 88
88 -
 89
89 -
 90
90 -
 91
91 -
92
-
93
-
94
-
95
-
96
-
97
-
98
-
99
-
100
-
101
-
102
-
103
-
104
-
105
-
106
-
107
-
108
-
109
-
110
-
111
-
112
-
113
-
114
-
115
-
116
-
117
-
118
-
119
-
120
-
121
-
122
-
123
-
124
-
125
-
126
-
127
-
128
-
129
-
130
-
131
-
132
-
133
-
134
-
135
-
136
-
137
-
138
-
139
-
140
-
141
-
142
-
143
-
144
-
145
-
146
-
147
-
148
-
149
-
150
-
151
-
152
-
153
-
154
-
155
-
156
-
157
-
158
-
159
-
160
-
161
-
162
-
163
-
164
-
165
-
166
-
167
-
168
-
169
-
170
-
171
-
172
-
173
-
174
-
175
-
176
-
177
-
178
-
179
-
180
-
181
-
182
-
183
-
184
-
185
-
186
-
187
-
188
-
189
-
190
 |
 |