Epson PowerLite 735c User Manual - Page 113
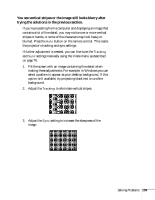
The message, is displayed., Only part of the computer image is displayed., The image isn't square
 |
View all Epson PowerLite 735c manuals
Add to My Manuals
Save this manual to your list of manuals |
Page 113 highlights
The message Not Supported is displayed. ■ Make sure the correct Input Signal is selected in the Video menu (see page 77). ■ Make sure your computer's resolution doesn't exceed UXGA (1600 × 1200), and the frequency is supported by the projector (see page 122). If necessary, change your computer's resolution setting as described on the following page. Only part of the computer image is displayed. ■ Press the Auto button on the remote control. ■ Make sure the image Position setting is correct on the Video menu. See page 76 for more information. ■ Make sure your computer's resolution setting is correct. Ideally, it should be 1024 × 768 to match the projector's native resolution. If this option isn't available, select one of the other compatible video formats listed on page 122. ■ Windows: Right-click the desktop, select Properties, click the Settings tab, and select a different resolution. ■ Macintosh: On the Apple menu, choose Control Panels, then click Monitors and Sound. Select a different resolution. ■ You also may need to modify existing presentation files if you created them for a different resolution. See your software documentation for specific information. The image isn't square, but trapezoid-shaped. ■ If you've tilted up the projector by extending the legs, the image will be broader at the top. Hold down the left or right side of the Keystone button on the projector until the image is square. ■ If the projector is angled toward the screen from the left or right, the image will be broader on one side. Center the projector in front of the middle of the screen, facing the screen squarely. Solving Problems 107
-
 1
1 -
2
-
3
-
4
-
5
-
6
-
7
-
8
-
9
-
10
-
11
-
12
-
13
-
14
-
15
-
16
-
17
-
18
-
19
-
20
-
21
-
22
-
23
-
24
-
25
-
26
-
27
-
28
-
29
-
30
-
31
-
32
-
33
-
34
-
35
-
36
-
37
-
38
-
39
-
40
-
41
-
42
-
43
-
44
-
45
-
46
-
47
-
48
-
49
-
50
-
51
-
52
-
53
-
54
-
55
-
56
-
57
-
58
-
59
-
60
-
61
-
62
-
63
-
64
-
65
-
66
-
67
-
68
-
69
-
70
-
71
-
72
-
73
-
74
-
75
-
76
-
77
-
78
-
79
-
80
-
81
-
82
-
83
-
84
-
85
-
86
-
87
-
88
-
89
-
90
-
91
-
92
-
93
-
94
-
95
-
96
-
97
-
98
-
99
-
100
-
101
-
102
-
103
-
104
-
105
-
106
-
107
-
 108
108 -
 109
109 -
 110
110 -
 111
111 -
 112
112 -
 113
113 -
 114
114 -
 115
115 -
 116
116 -
 117
117 -
 118
118 -
119
-
120
-
121
-
122
-
123
-
124
-
125
-
126
-
127
-
128
-
129
-
130
-
131
-
132
-
133
-
134
-
135
-
136
-
137
-
138
-
139
-
140
-
141
-
142
-
143
-
144
 |
 |
